Libdogecoin, a clean C library of Dogecoin building blocks
![]()
![]()
![]()
Table of Contents
What is Libdogecoin?
Libdogecoin will be a complete implementation of the Dogecoin Protocols, as a C library (and series of bindings to popular languages) which will allow anyone to build a Dogecoin compliant product, without needing to worry about the deeper, complicated specifics of the crypto functions.
Libdogecoin is here to make crypto development simple, clean, and fun!
This will be a pure library, providing a set of callable functions to implement in external projects, but not a ‘runnable’ node facility. Although we expect building a Dogecoin Node will be a useful test and early outcome, that will live in another repository.
It is intended that connecting the bits together into an engine be done at the level above, via the networking libraries of the host language.
See the Project Roadmap for more on the planned stages of development
See the Dogecoin Trailmap for more on libdogecoin
Advantages of Libdogecoin
- No dependencies in case no p2p network client is required (only dependencies are libsecp256k1 added as git subtree and optionally (enabled by default) libunistring for mnemonics)
- The only dependency for the p2p network client is libevent (very portable)
- optimized for MCU and low mem environments
- ~full test coverage
- Best effort to to be mem leak free (manual valgrind check per supported platform)
Current features
- Generating and storing private and public keys
- ECDSA secp256k1 signing and verification (through libsecp256k1 included as git subtree)
- Generate recoverable signatures (and recover pubkey from signatures)
- BIP32 hierarchical deterministic key derivation
- Transaction generation, manipulation, signing and ser-/deserialization including P2PKH, P2SH, multisig
- Address generation
- Base58check encoding
- Native implementation of SHA256, SHA512, SHA512_HMAC, RIPEMD-160 including NIST testvectors
- Native constant time AES (+256CBC) cipher implementation including NIST testvectors
- Event based dogecoin P2P client capable of connecting to multiple nodes in a single thread (requires libevent)
Why C?
The Dogecoin Core project is written in C++, why move to C? This is a good question.
The Dogecoin Core project was inherited when Dogecoin was originally forked and makes use of some reasonable heavy C++ libraries that add complexity to the build process, as well as cognitive complexity for new developers.
The desire is to provide a simple to learn library with few external dependencies that can be built with relatively little setup by new developers. Furthermore the aim of providing wrappers for a number of higher-level languages leans strongly toward either C or RUST from a binding/support perspective, and we believe C still has significantly more support when writing bindings for a wide variety of other languages. C is better supported on embedded/lightweight platforms, with the goal of moving dogecoin beyond the realm of the PC; and actually prepares (constrains it) to be re-coded/adapted in other languages as specific OO and memory mgmt functions of C++ aren't required. Wrappers that previously lived here in this repository have been moved to their own respective projects (python and go bindings) found at @dogeorg.
Dogecoin Standard/Spec
During the process of extracting the fundamentals from the Dogecoin Core Wallet (reference implementation) we aim to document ‘how Dogecoin works’ as a suite of tests and documents we are calling the Dogecoin Standard.
See /spec
By doing this we will be able to verify that the Libdogecoin implementation of Dogecoin’s internals is accurate to the OG wallet, and thus provide a mechanism for any future Dogecoin implementations to verify compliance with the Dogecoin Network.
Code of Shibes
By contributing to this repository you agree to be a basic human being, please see CONDUCT.md
Contributing
TL;DR: Initially during the early phase of development we'll keep this basic, after the library starts to become a dependency for projects in real-world active use this will likely change and the API will become considerably more extensive.
- Express interest and get added to the libdogecoin team on GitHub and join the conversation in the Foundation discord server.
- Branch/PRs in this repository (see above point for access)
- Ensure tests pass and coverage is maintained
- Update libdogecoin.h in [
/include/] and example.c in [/contrib/examples/] - 1 approval from another contributor required to merge to main
- Don't introduce dependencies without discussion (MIT); our aim is to have as few dependencies as possible, with the ideal (possibly unachievable) goal of having none beyond standard c libs and a compiler.
- Collaborate before you innovate! (this means, discuss what you're working on where everyone can see, before submitting a change.)
- Have fun <3
Repository Navigation
Advice on how to navigate this repository:
- [
/.libs/] where the static library lives after it has been fully built. - [
/contrib/<proj>] a place for misc non-core experiments, utils, demo-nodes etc. - [
/spec/*.md] a place to begin documenting the Dogecoin Standard as we go. - [
/include/dogecoin/*.h] provides header files for libdogecoin users, look here for .h. - [
/src/<feature>/*.c,*.h] look here for local .c/.h source implementing the contracts in/include. - [
/test/] test suite. - [
/] Makefile, license, basic readmes and build control files
The documentation has many helpful resources regarding setup and usage of Libdogecoin, along with some educational content on the specifics of Dogecoin protocols. Their contents are listed below:
address.mdFull description of dogecoin addresses and the Libdogecoin Essential Address API.getting_started.mdDetailed instructions for building, installing, and implementing the library in your project.project_roadmap.mdOur plan for the future of Libdogecoin (with pictures!).tools.mdGuidance on how to use provided helper scripts and tools likesuchandsendtx.transaction.mdFull description of dogecoin transactions and the Libdogecoin Essential Transaction API.
Quick Start
For more detailed build and installation instructions, please refer to getting_started.md
Preliminary
Before attempting to build, make sure all the necessary dependencies for your architecture are installed.
Debian/Ubuntu
sudo apt-get install autoconf automake libtool build-essential libevent-dev libunistring-dev
MacOS
xcode_select --install
sudo chown -R $(whoami) $(brew --prefix)/*
Other - Please submit a pull request to add dependencies for your system, or update these.
Building
Debian / Ubuntu
To build the full library, including the such and sendtx CLI tools, run the following autoconf commands:
./autogen.sh
./configure
make
To build the pure library without net support, add the following flags to the ./configure command:
./autogen.sh
./configure --disable-net --disable-tools
make
CMake
To build with cmake run the following from the project root directory:
mkdir build
cd build
cmake ..
cmake --build .
Integration
Using Libdogecoin in your own project is very simple! Once the library is built, you will see the resulting libdogecoin.a file in the /.libs folder. Additionally, you will want to locate the libdogecoin.h header file in the /include/dogecoin folder. Move both of these files into your project directory, or somewhere where the compiler can find them. In your source code which uses the Libdogecoin API, make sure to include this libdogecoin.h header at the top of your code.
The following instructions show how to build and integrate libdogecoin under Linux, This will vary somewhat for other operating systems; but the process itself should be roughly analogous.
In addition to the following instructions we've created an example file that contains functions stopping at the latest version which is found in /contrib/examples/example.c.
To compile that example with gcc, first build libdogecoin so the resulting .a file will be found in /.libs and execute:
gcc ./contrib/examples/example.c ./.libs/libdogecoin.a -I./include/dogecoin -L./.libs -ldogecoin -lunistring -o example
then run the example: ./example. Otherwise continue with something like the folowing:
main.c:
#include <stdio.h>
#include "libdogecoin.h"

int main() {
    // your code here...
}
Once you are ready to compile, the libdogecoin.a file must be linked to your source code, along with libevent and libunistring. The resulting compilation command will looks similar to this:
gcc main.c -ldogecoin -levent -lunistring -o myprojectname
Getting Started with Libdogecoin
Download Pre-built Binaries
To use Libdogecoin directly out of the box without making any modifications to the source code, you can download the pre-made binaries from https://github.com/dogecoinfoundation/libdogecoin/releases. This is the easiest to start with for new developers, but does not enable customization of the library. In order increase control over installation, refer to the section below on manually building Libdogecoin.
Building Manually
Step 1: Install Dependencies
For Ubuntu and Debian Linux, you will need to install the following dependencies before building:
- autoconf
- automake
- libtool
- libevent-dev
- libunistring-dev
- build-essential
This can be done in the following commands using Linux CLI:
sudo apt-get update
sudo apt-get install autoconf automake libtool libevent-dev libunistring-dev build-essential
For Windows, you will need to install the following dependencies before building:
Step 2: Build Libraries
If all the necessary dependencies have been installed, you can now proceed in building the library. Using autoconf tools, run the ./autogen.sh command in terminal:
./autogen.sh
Next, you can configure the library to your liking by specifying flags on the ./configure command. (This is especially important for cross compilation as shown in the cross compilation section.)
At this step there are plenty of flags that can be specified, the two most pertinent ones being enable-tools/disable-tools and enable-net/disable-net. Both are enabled by default, but if you do not need to use the CLI tools mentioned in tools.md or are not planning to send transactions using Libdogecoin, you may want to consider disabling these flags for simplicity and speed. Here are some examples of possible configurations you can build:
./configure
./configure --disable-net --disable-tools
./configure LD_LIBRARY_PATH='path/to/additional/libraries'
./configure CFLAGS='-Ipath/to/additional/include/files'
If you're building on Windows, you'll need to use cmake instead of ./configure:
mkdir build
cd build
cmake ..
Another useful flag is --enable-test-passwd, which will generate a random password for testing software encryption/decryption. This flag disables the need for a password to be entered when testing TPM encryption/decryption. Note: this flag is for testing purposes only. This flag is disabled by default, but can be enabled with the ./configure command or by using cmake:
./configure --enable-test-passwd
cmake -DTEST_PASSWD=TRUE ..
--enable-test-passwd is for testing purposes only.
For a complete list of all different configuration options, you can run the command ./configure --help.
Finally, once you have configured the library to your liking, it is ready to be built. This can be done with the simple make command:
make
Or, if you would like to also run our basic unit tests, you can run the command make check which will both build the library and give output showing which files are not passing tests. Note: when compiling with net enabled, this will appear to hang for a couple of seconds after test_tool(), but rest assured that it is running.
make check
Output:
make[1]: Entering directory '/home/username/libdogecoin'
make  check-TESTS
make[2]: Entering directory '/home/username/libdogecoin'
PASSED - test_address()
PASSED - test_aes()
PASSED - test_base58()
PASSED - test_bip32()

...

PASSED - test_tool()
PASSED - test_net_basics_plus_download_block()
PASSED - test_protocol()
PASS: tests
=============
1 test passed
=============
make[2]: Leaving directory '/home/username/libdogecoin'
make[1]: Leaving directory '/home/username/libdogecoin'
On Windows, you will need to run the following commands in the Visual Studio Developer Command Prompt:
mkdir build
cd build
cmake ..
cmake --build .
Debug\tests.exe
Step 3: Integrate in Your Project
At this point, the library file libdogecoin.a located in the /.libs folder is now fully built and can be moved to any location on your file system. To integrate into your project, you will want to move this file by whatever means (copy-paste, drag-and-drop, mv command, etc.) to a location inside of your project where the linker can find it. If it is not directly in your project folder, you will need to specify the path by using the -L flag during compilation.
You will want to do the same with the libdogecoin.h header (located in /include/dogecoin) in order to integrate the Libdogecoin functions into your source code. Be sure to write an include statement for this file at the top of any source code which uses Libdogecoin, like the example below:
main.c:
#include <stdio.h>
#include "libdogecoin.h"

int main() {
    // your code here...
}
Again, for compilation later, if libdogecoin.h is not directly next to your source code, specify the path to the header file using the -I flag.
From here, you can call the Libdogecoin API from your program as you normally would any function, as shown below. For more examples on the context in which to use these functions, please refer to address.md and transaction.md. In this particular script, the user is generating a new key pair at which to receive funds, and is constructing a transaction to send funds to this new address from an existing wallet.
main.c:
#include "libdogecoin.h"
#include <stdio.h>

int main() {
    dogecoin_ecc_start();

    // establish existing info (utxo is worth 2 doge)
    char *oldPrivKey = "ci5prbqz7jXyFPVWKkHhPq4a9N8Dag3TpeRfuqqC2Nfr7gSqx1fy";
    char *oldPubKey = "031dc1e49cfa6ae15edd6fa871a91b1f768e6f6cab06bf7a87ac0d8beb9229075b";
    char *oldScriptPubKey = "76a914d8c43e6f68ca4ea1e9b93da2d1e3a95118fa4a7c88ac";
    char* utxo_id = "b4455e7b7b7acb51fb6feba7a2702c42a5100f61f61abafa31851ed6ae076074";
    int utxo_vout = 1;
    char* amt_total = "2.0";

    // generate new key pair to send to
    char newPrivKey[PRIVKEYWIFLEN];
    char newPubKey[P2PKHLEN];
    generatePrivPubKeypair(newPrivKey, newPubKey, false);

    // build and sign the transaction
    int idx = start_transaction();
    add_utxo(idx, utxo_id, utxo_vout);
    add_output(idx, newPubKey, "0.69");
    finalize_transaction(idx, newPubKey, "0.00226", amt_total, oldPubKey);
    sign_transaction(idx, oldScriptPubKey, oldPrivKey);

    // print result
    printf("\nFinal signed transaction hex: %s\n\n", get_raw_transaction(idx));

    dogecoin_ecc_stop();
}
The last step is to specify the libraries you will need to link into your project, done by using the -l flag. The libraries that are required to use Libdogecoin in your project are:
- libdogecoin (of course!)
- libevent_core
- libunistring
On the command line, your final compilation will look something like the command below, factoring in all of the steps previously mentioned. Note: the prefix "lib" is excluded when specifying libraries to link.
gcc main.c -L./path/to/library/file -I./path/to/header/file -ldogecoin -levent_core -lunistring -o myprojectname
Congratulations, you have just built an executable program that implements Libdogecoin!
Cross Compilation with Depends
There may be times when you would like to build the library for a different operating system than you are currently running. You can do this relatively easily with depends, included in the Libdogecoin repo! The available operating systems you can choose from are the following:
- arm-linux-gnueabihf
- armv7a-linux-android
- aarch64-linux-gnu
- aarch64-linux-android
- x86_64-pc-linux-gnu
- x86_64-apple-darwin
- x86_64-w64-mingw32
- x86_64-linux-android
- i686-w64-mingw32
- i686-pc-linux-gnu
The build steps for cross compilation are very similar to the native build steps listed above. Specify the desired architecture from the list above under by using the HOST flag, and include any necessary configuration flags on the ./configure command:
make -C depends HOST=<target_architecture>
./autogen.sh
./configure --prefix=`pwd`/depends/<target_architecture>
make check
It is important to run make check after cross compiling to make sure that everything is running properly for your architecture. For some guidance on which configuration flags to run, you can refer to our CI test file.
Libdogecoin Address API
Table of Contents
- Libdogecoin Address API
Introduction
A Dogecoin address is the public key of an asymmetric key pair, and provides a designation on the network to hold Dogecoins on the ledger. By holding the private key for an address on the ledger, you have the ability to sign transactions to move (spend/send) the Dogecoins attributed to the address.
Dogecoin addresses can be created in a number of ways, each with benefits depending on the objective of the address owner(s). A couple of these are listed below:
Simple Addresses
These are the most common form of Dogecoin address, a single private key with a single public key (address). Most often these are what an exchange would use to retain full custody of a wallet on behalf of their users, or for a simple desktop / mobile wallet they provide a basic approach to address management.
HD Addresses
HD, or Hierarchical Deterministic addresses, unlike simple addresses are created from a seed key-phrase, usually twelve random unique words rather than a 256-bit private key. The key-phrase is then used (with the addition of a simple, incrementing number) to generate an unlimited supply of public Dogecoin addresses which the holder of the key-phrase can sign.
Seed phrases
Seed phrases, also known as mnemonic phrases, are a commonly used method to create and backup HD addresses. These phrases consist of 12 or 24 random words, generated from a 128 or 256-bit entropy source, respectively. Seed phrases can then be used to generate an HD address.
When using seed phrases to generate HD addresses, it is essential to ensure the security of the seed phrase. Seed phrases should be treated with extreme caution and must be stored safely in a secure location. There are several steps that you can take to ensure that your seed phrase remains secure:
- Do not type your seed phrase into any device connected to the internet, as it could be compromised by malware or keyloggers.
- Store your seed phrase offline in a secure and tamper-evident location, such as a hardware wallet, paper wallet or encrypted digital storage device.
- Do not share your seed phrase with anyone, as it grants access to all the funds in your wallet.
- Use a strong, unique and memorable passphrase to protect your seed phrase from unauthorized access.
When embedding libdogecoin in your project, it is important to consider the wallet type you are using. HD wallets, which use seed phrases to generate addresses, are generally considered more secure than simple wallets, which use a single private key for all addresses. Hot wallets, which are connected to the internet, are more convenient to use but are also more vulnerable to attacks. Cold wallets, which are kept offline, are more secure but may be less convenient to use for frequent transactions. You should carefully consider your security needs and choose the appropriate wallet type for your project.
Simple Address Generation Process
The first step to create a simple pay-to-public-key-hash (p2pkh) address is to generate the private key, which is a randomly generated 256-bit (32-byte) unsigned integer. This must be done within a secp256k1 context in order to generate a private key, as this context ensures the key's validity can be mathematically proven by other validators.
This random private key is then encoded into wallet import format (WIF) which makes the private key readable and easier to copy. If viewing this private key, DO NOT REVEAL IT TO ANYONE ELSE! This private key grants you the ability to spend any Dogecoin sent to any public key associated with this private key, and sharing it will compromise all funds in your wallet.
The next step in the process is deriving the public key from the private key, using the mathematical properties of the secp256k1 elliptical curve (this is done internally by Libdogecoin). This should be done within the same context that was created at the beginning of the session, because it is expensive to regenerate all the cryptographic information necessary and this extraneous computation should be avoided.
One thing to note is that this public key is NOT the same as a Dogecoin address. The final step in the address generation process is to convert the public key (in the form of seemingly random bytes) into a readable, valid Dogecoin address. The steps for achieving this are as follows:
- Pass the public key once through a SHA256 hash function.
- Pass the result of this hash into a RIPEMD-160 hash function.
- Prefix this RIPEMD-160 result with the character associated with the specified blockchain. ('D' for mainnet, 'n' for testnet)
- Double-hash the current string (prefix + RIPEMD-160 result) with SHA256 and save the result as a 32-byte checksum.
- Append the first 4 bytes of this checksum to the current string.
- Encode the current string with base58 to get the final Dogecoin p2pkh address.
You now have a valid Dogecoin address! Its validity can be checked using the verifyPrivPubKeypair() function, which assesses whether the checksum holds after the address undergoes base58 decoding. Keep in mind, the public key cannot be derived from this p2pkh address because it was passed through irreversible hash functions. However, this address can now be used to receive funds and eventually spend them using the private key generated in the beginning.
These steps can be very confusing, so Libdogecoin does all of them for you when you call generatePrivPubKeyPair(), from private key generation to public key derivation to p2pkh address conversion. The process is very similar for HD key pair generation but with a little more complexity involved in generating the raw key pair. For more information on how to call the functions that perform the process listed above, see the Essential API description below.
Essential Address API
These functions implement the core functionality of Libdogecoin for address generation and validation, and are described in depth below. You can access them through a C program, by including the libdogecoin.h header in the source code and including the libdogecoin.a library at compile time.
When using functions from either the Essential or Advanced Address API, include the -lunistring flag during the linking process. This is because the Advanced Address API uses the GNU libunistring library for Unicode string manipulation. To include the -lunistring flag during linking, simply add it to the linker command when building your project:
gcc -o example example.c -ldogecoin -lunistring
Ensure that the libunistring library is installed on your system before linking.
generatePrivPubKeypair:
int generatePrivPubKeypair(char* wif_privkey, char* p2pkh_pubkey, bool is_testnet)
This function will populate provided string variables (privkey, pubkey) with freshly generated respective private and public keys, specifically for either mainnet or testnet as specified through the network flag (is_testnet). The function returns 1 on success and 0 on failure.
C usage:
#include "libdogecoin.h"
#include <stdio.h>

int main() {
  int privkeyLen = PRIVKEYWIFLEN;
  int pubkeyLen = P2PKHLEN;

  char privKey[privkeyLen];
  char pubKey[pubkeyLen];

  dogecoin_ecc_start();
  generatePrivPubKeypair(privKey, pubKey, false); // generating a mainnet pair
  dogecoin_ecc_stop();

  printf("My private key for mainnet is: %s\n", privKey);
  printf("My public key for mainnet is: %s\n", pubKey);
}
generateHDMasterPubKeypair:
int generateHDMasterPubKeypair(char* hd_privkey_master, char* p2pkh_pubkey_master, bool is_testnet)
This function will populate provided string variables (privkey, pubkey) with freshly generated respective private and public keys for a hierarchical deterministic wallet, specifically for either mainnet or testnet as specified through the network flag (is_testnet). The function returns 1 on success and 0 on failure.
C usage:
#include "libdogecoin.h"
#include <stdio.h>

int main() {
  int masterPrivkeyLen = HDKEYLEN; // enough cushion
  int pubkeyLen = P2PKHLEN;

  char masterPrivKey[masterPrivkeyLen];
  char masterPubKey[pubkeyLen];

  dogecoin_ecc_start();
  generateHDMasterPubKeypair(masterPrivKey, masterPubKey, false);
  dogecoin_ecc_stop();

  printf("My private key for mainnet is: %s\n", masterPrivKey);
  printf("My public key for mainnet is: %s\n", masterPubKey);
}
generateDerivedHDPubKey:
int generateDerivedHDPubkey(const char* hd_privkey_master, char* p2pkh_pubkey)
This function takes a given HD master private key (hd_privkey_master) and loads it into the provided pointer for the resulting derived public key (p2pkh_pubkey). This private key input should come from the result of generateHDMasterPubKeypair(). The function returns 1 on success and 0 on failure.
C usage:
#include "libdogecoin.h"
#include <stdio.h>

int main() {
  int masterPrivkeyLen = HDKEYLEN; // enough cushion
  int pubkeyLen = P2PKHLEN;

  char masterPrivKey[masterPrivkeyLen];
  char masterPubKey[pubkeyLen];
  char childPubKey[pubkeyLen];

  dogecoin_ecc_start();
  generateHDMasterPubKeypair(masterPrivKey, masterPubKey, false);
  generateDerivedHDPubkey(masterPrivKey, childPubKey);
  dogecoin_ecc_stop();

  printf("master private key: %s\n", masterPrivKey);
  printf("master public key: %s\n", masterPubKey);
  printf("derived child key: %s\n", childPubKey);
}
verifyPrivPubKeypair
int verifyPrivPubKeypair(char* wif_privkey, char* p2pkh_pubkey, bool is_testnet)
This function requires a previously generated key pair (wif_privkey, p2pkh_pubkey) and the network they were generated for (is_testnet). It then validates that the given public key was indeed derived from the given private key, returning 1 if the keys are associated and 0 if they are not. This could be useful prior to signing, or in some kind of wallet recovery tool to match keys.
C usage:
#include "libdogecoin.h"
#include <stdio.h>

int main() {
  int privkeyLen = PRIVKEYWIFLEN;
  int pubkeyLen = P2PKHLEN;

  char privKey[privkeyLen];
  char pubKey[pubkeyLen];

  dogecoin_ecc_start();
  generatePrivPubKeypair(privKey, pubKey, false);

  if (verifyPrivPubKeypair(privKey, pubKey, false)) {
    printf("Keypair is valid.\n");
  }
  else {
    printf("Keypair is invalid.\n");
  }
  dogecoin_ecc_stop();
}
verifyHDMasterPubKeypair
int verifyHDMasterPubKeypair(char* hd_privkey_master, char* p2pkh_pubkey_master, bool is_testnet)
This function validates that a given master private key matches a given master public key. This could be useful prior to signing, or in some kind of wallet recovery tool to match keys. This function requires a previously generated HD master key pair (hd_privkey_master, p2pkh_pubkey_master) and the network they were generated for (is_testnet). It then validates that the given public key was indeed derived from the given master private key, returning 1 if the keys are associated and 0 if they are not. This could be useful prior to signing, or in some kind of wallet recovery tool to match keys.
C usage:
#include "libdogecoin.h"
#include <stdio.h>

int main() {
  int masterPrivkeyLen = HDKEYLEN; // enough cushion
  int pubkeyLen = P2PKHLEN;

  char masterPrivKey[masterPrivkeyLen];
  char masterPubKey[pubkeyLen];

  dogecoin_ecc_start();
  generateHDMasterPubKeypair(masterPrivKey, masterPubKey, false);

  if (verifyHDMasterPubKeypair(masterPrivKey, masterPubKey, false)) {
    printf("Keypair is valid.\n");
  }
  else {
    printf("Keypair is invalid.\n");
  }
  dogecoin_ecc_stop();
}
verifyP2pkhAddress
int verifyP2pkhAddress(char* p2pkh_pubkey, uint8_t len)
This function accepts an existing public key (p2pkh_pubkey) and its length in characters (len) to perform some basic validation to determine if it looks like a valid Dogecoin address. It returns 1 if the address is valid and 0 if it is not. This is useful for wallets that want to check that a recipient address looks legitimate.
C usage:
#include "libdogecoin.h"
#include <stdio.h>

int main() {
  int privkeyLen = HDKEYLEN; // enough cushion
  int pubkeyLen = P2PKHLEN;

  char privKey[privkeyLen];
  char pubKey[pubkeyLen];

  dogecoin_ecc_start();
  generatePrivPubKeypair(privKey, pubKey, false);

  if (verifyP2pkhAddress(pubKey, strlen(pubKey))) {
    printf("Address is valid.\n");
  }
  else {
    printf("Address is invalid.\n");
  }
  dogecoin_ecc_stop();
}
getHDNodePrivateKeyWIFByPath
char* getHDNodePrivateKeyWIFByPath(const char* masterkey, const char* derived_path, char* outaddress, bool outprivkey)
This function derives a hierarchical deterministic child key by way of providing the extended master key, derived_path, outaddress and outprivkey. It will return the dogecoin_hdnode's private key serialized in WIF format if successful and exits if the proper arguments are not provided.
C usage:
#include "libdogecoin.h"
#include <assert.h>
#include <stdio.h>

int main() {
  size_t extoutsize = 112;
  char* extout = dogecoin_char_vla(extoutsize);
  char* masterkey_main_ext = "dgpv51eADS3spNJh8h13wso3DdDAw3EJRqWvftZyjTNCFEG7gqV6zsZmucmJR6xZfvgfmzUthVC6LNicBeNNDQdLiqjQJjPeZnxG8uW3Q3gCA3e";
  dogecoin_ecc_start();
  u_assert_str_eq(getHDNodePrivateKeyWIFByPath(masterkey_main_ext, "m/44'/3'/0'/0/0", extout, true), "QNvtKnf9Qi7jCRiPNsHhvibNo6P5rSHR1zsg3MvaZVomB2J3VnAG");
  u_assert_str_eq(extout, "dgpv5BeiZXttUioRMzXUhD3s2uE9F23EhAwFu9meZeY9G99YS6hJCsQ9u6PRsAG3qfVwB1T7aQTVGLsmpxMiczV1dRDgzpbUxR7utpTRmN41iV7");
  dogecoin_ecc_stop();
  free(extout);
}
getHDNodeAndExtKeyByPath
dogecoin_hdnode* getHDNodeAndExtKeyByPath(const char* masterkey, const char* derived_path, char* outaddress, bool outprivkey)
This function derives a hierarchical deterministic child key by way of providing the extended master key, derived_path, outaddress and outprivkey. The masterkey can be either a private or public key, but if it is a public key, the outprivkey flag must be set to false and the derived_path must be a public derivation path. It will return the dogecoin_hdnode if successful and exits if the proper arguments are not provided.
C usage:
#include "libdogecoin.h"
#include <assert.h>
#include <stdio.h>

int main() {
  size_t extoutsize = 112;
  char* extout = dogecoin_char_vla(extoutsize);
  char* masterkey_main_ext = "dgpv51eADS3spNJh8h13wso3DdDAw3EJRqWvftZyjTNCFEG7gqV6zsZmucmJR6xZfvgfmzUthVC6LNicBeNNDQdLiqjQJjPeZnxG8uW3Q3gCA3e";
  dogecoin_ecc_start();
  dogecoin_hdnode* hdnode = getHDNodeAndExtKeyByPath(masterkey_main_ext, "m/44'/3'/0'/0/0", extout, true);
  u_assert_str_eq(utils_uint8_to_hex(hdnode->private_key, sizeof hdnode->private_key), "09648faa2fa89d84c7eb3c622e06ed2c1c67df223bc85ee206b30178deea7927");
  dogecoin_privkey_encode_wif((const dogecoin_key*)hdnode->private_key, &dogecoin_chainparams_main, privkeywif_main, &wiflen);
  u_assert_str_eq(privkeywif_main, "QNvtKnf9Qi7jCRiPNsHhvibNo6P5rSHR1zsg3MvaZVomB2J3VnAG");
  u_assert_str_eq(extout, "dgpv5BeiZXttUioRMzXUhD3s2uE9F23EhAwFu9meZeY9G99YS6hJCsQ9u6PRsAG3qfVwB1T7aQTVGLsmpxMiczV1dRDgzpbUxR7utpTRmN41iV7");
  dogecoin_ecc_stop();
  dogecoin_hdnode_free(hdnode);
  free(extout);
}
#include "libdogecoin.h"
#include <assert.h>
#include <stdio.h>

int main() {
  char masterkey[HDKEYLEN] = {0};
  char master_public_key[HDKEYLEN] = {0};
  char extkeypath[KEYPATHMAXLEN] = "m/0/0/0/0/0";
  char extpubkey[HDKEYLEN] = {0};
  dogecoin_ecc_start();

  // Generate a master key pair from the seed, and then get the master public key
  getHDRootKeyFromSeed(utils_hex_to_uint8("5eb00bbddcf069084889a8ab9155568165f5c453ccb85e70811aaed6f6da5fc19a5ac40b389cd370d086206dec8aa6c43daea6690f20ad3d8d48b2d2ce9e38e4"), MAX_SEED_SIZE, false, masterkey);
  getHDPubKey(masterkey, false, master_public_key);

  // Derive an extended normal (non-hardened) public key from the master public key
  getHDNodeAndExtKeyByPath(master_public_key, extkeypath, extpubkey, false);
  dogecoin_ecc_stop();
  printf("%s\n", extpubkey);
}
getDerivedHDAddress
int getDerivedHDAddress(const char* masterkey, uint32_t account, bool ischange, uint32_t addressindex, char* outaddress, bool outprivkey)
This function derives a hierarchical deterministic address by way of providing the extended master key, account, ischange and addressindex. It will return 1 if the function is successful and 0 if not.
C usage:
#include "libdogecoin.h"
#include <assert.h>
#include <stdio.h>

int main() {
  size_t extoutsize = 112;
  char* extout = dogecoin_char_vla(extoutsize);
  char* masterkey_main_ext = "dgpv51eADS3spNJh8h13wso3DdDAw3EJRqWvftZyjTNCFEG7gqV6zsZmucmJR6xZfvgfmzUthVC6LNicBeNNDQdLiqjQJjPeZnxG8uW3Q3gCA3e";
  dogecoin_ecc_start();
  int res = getDerivedHDAddress(masterkey_main_ext, 0, false, 0, extout, true);
  u_assert_int_eq(res, true);
  u_assert_str_eq(extout, "dgpv5BeiZXttUioRMzXUhD3s2uE9F23EhAwFu9meZeY9G99YS6hJCsQ9u6PRsAG3qfVwB1T7aQTVGLsmpxMiczV1dRDgzpbUxR7utpTRmN41iV7");
  dogecoin_ecc_stop();
  free(extout);
}
getDerivedHDAddressByPath
int getDerivedHDAddressByPath(const char* masterkey, const char* derived_path, char* outaddress, bool outprivkey)
This function derives an extended HD address by custom path in string format (derived_path). It returns 1 if the address is valid and 0 if it is not.
C usage:
#include "libdogecoin.h"
#include <assert.h>
#include <stdio.h>

int main() {
  size_t extoutsize = 112;
  char* extout = dogecoin_char_vla(extoutsize);
  char* masterkey_main_ext = "dgpv51eADS3spNJh8h13wso3DdDAw3EJRqWvftZyjTNCFEG7gqV6zsZmucmJR6xZfvgfmzUthVC6LNicBeNNDQdLiqjQJjPeZnxG8uW3Q3gCA3e";
  dogecoin_ecc_start();
  res = getDerivedHDAddressByPath(masterkey_main_ext, "m/44'/3'/0'/0/0", extout, true);
  u_assert_int_eq(res, true);
  u_assert_str_eq(extout, "dgpv5BeiZXttUioRMzXUhD3s2uE9F23EhAwFu9meZeY9G99YS6hJCsQ9u6PRsAG3qfVwB1T7aQTVGLsmpxMiczV1dRDgzpbUxR7utpTRmN41iV7");
  dogecoin_ecc_stop();
  free(extout);
}
Advanced Address API
These functions implement advanced functionality of Libdogecoin for address generation and validation, and are described in depth below. You can access them through a C program, by including the libdogecoin.h header in the source code and including the libdogecoin.a library at compile time.
generateRandomEnglishMnemonic
int generateRandomEnglishMnemonic(const ENTROPY_SIZE size, MNEMONIC mnemonic);
This function generates a random English mnemonic phrase (seed phrase). The function returns 0 on success and -1 on failure.
C usage:
#include "libdogecoin.h"
#include <stdio.h>

int main () {
  MNEMONIC seed_phrase;

  dogecoin_ecc_start();
  generateRandomEnglishMnemonic("256", seed_phrase);
  dogecoin_ecc_stop();

  printf("%s\n", seed_phrase);
}
C++ usage:
extern "C" {
#include "libdogecoin.h"
}
#include <iostream>
using namespace std;

int main () {
  MNEMONIC seed_phrase;

  dogecoin_ecc_start();
  generateRandomEnglishMnemonic("256", seed_phrase);
  dogecoin_ecc_stop();

  cout << seed_phrase << endl;
}
generateRandomEnglishMnemonicTPM
dogecoin_bool generateRandomEnglishMnemonicTPM(MNEMONIC mnemonic, const int file_num, const dogecoin_bool overwrite);
This function generates a random English mnemonic using a TPM (Trusted Platform Module). It stores the generated mnemonic in the provided mnemonic buffer. The file_num parameter specifies the encrypted storage file number, and the overwrite parameter indicates whether to overwrite an existing mnemonic in the encrypted storage. The function returns TRUE on success and FALSE on failure.
C usage:
#include "libdogecoin.h"

int main() {
    MNEMONIC mnemonic;
    int file_num = 0;  // Specify the TPM storage file number
    dogecoin_bool overwrite = TRUE;  // Set to TRUE to overwrite existing mnemonic

    if (generateRandomEnglishMnemonicTPM(mnemonic, file_num, overwrite)) {
        printf("Generated mnemonic: %s\n", mnemonic);
    } else {
        printf("Error generating mnemonic.\n");
        return -1;
    }
}
getDerivedHDAddressFromMnemonic
int getDerivedHDAddressFromMnemonic(const uint32_t account, const uint32_t index, const CHANGE_LEVEL change_level, const MNEMONIC mnemonic, const PASS pass, char* p2pkh_pubkey, const bool is_testnet);
This function generates a new dogecoin address from a mnemonic and a slip44 key path. The function returns 0 on success and -1 on failure.
C usage:
#include "libdogecoin.h"
#include <stdio.h>

int main () {
  int addressLen = P2PKHLEN;

  MNEMONIC seed_phrase;
  char address [addressLen];

  dogecoin_ecc_start();
  generateRandomEnglishMnemonic("256", seed_phrase);
  getDerivedHDAddressFromMnemonic(0, 0, "0", seed_phrase, NULL, address, false);
  dogecoin_ecc_stop();

  printf("%s\n", seed_phrase);
  printf("%s\n", address);
}
C++ usage:
extern "C" {
#include "libdogecoin.h"
}
#include <iostream>
using namespace std;

int main () {
  int addressLen = P2PKHLEN;

  MNEMONIC seed_phrase;
  char address [addressLen];

  dogecoin_ecc_start();
  generateRandomEnglishMnemonic("256", seed_phrase);
  getDerivedHDAddressFromMnemonic(0, 0, "0", seed_phrase, NULL, address, false);
  dogecoin_ecc_stop();

  cout << seed_phrase << endl;
  cout << address << endl;
}
getDerivedHDAddressFromEncryptedSeed
int getDerivedHDAddressFromEncryptedSeed(const uint32_t account, const uint32_t index, const CHANGE_LEVEL change_level, char* p2pkh_pubkey, const dogecoin_bool is_testnet, const int file_num);
This function generates a new Dogecoin address from an encrypted seed and a slip44 key path. The function returns 0 on success and -1 on failure.
C usage:
#include "libdogecoin.h"
#include <stdio.h>

int main() {
    int addressLen = P2PKHLEN;
    char derived_address[addressLen];

    if (getDerivedHDAddressFromEncryptedSeed(0, 0, BIP44_CHANGE_EXTERNAL, derived_address, false, TEST_FILE) == 0) {
        printf("Derived address: %s\n", derived_address);
    } else {
        printf("Error occurred.\n");
        return -1;
    }
}
getDerivedHDAddressFromEncryptedMnemonic
int getDerivedHDAddressFromEncryptedMnemonic(const uint32_t account, const uint32_t index, const CHANGE_LEVEL change_level, const PASS pass, char* p2pkh_pubkey, const bool is_testnet, const int file_num);
This function generates a new Dogecoin address from an encrypted mnemonic and a slip44 key path. The function returns 0 on success and -1 on failure.
C usage:
#include "libdogecoin.h"
#include <stdio.h>

int main() {
    int addressLen = P2PKHLEN;
    char derived_address[addressLen];

    if (getDerivedHDAddressFromEncryptedMnemonic(0, 0, BIP44_CHANGE_EXTERNAL, NULL, derived_address, false, TEST_FILE) == 0) {
        printf("Derived address: %s\n", derived_address);
    } else {
        printf("Error occurred.\n");
        return -1;
    }
}
getDerivedHDAddressFromEncryptedHDNode
int getDerivedHDAddressFromEncryptedHDNode(const uint32_t account, const uint32_t index, const CHANGE_LEVEL change_level, char* p2pkh_pubkey, const bool is_testnet, const int file_num);
This function generates a new Dogecoin address from an encrypted HD node and a slip44 key path. The function returns 0 on success and -1 on failure.
C usage:
#include "libdogecoin.h"
#include <stdio.h>

int main() {
    int addressLen = P2PKHLEN;
    char derived_address[addressLen];

    if (getDerivedHDAddressFromEncryptedHDNode(0, 0, BIP44_CHANGE_EXTERNAL, derived_address, false, TEST_FILE) == 0) {
        printf("Derived address: %s\n", derived_address);
    } else {
        printf("Error occurred.\n");
        return -1;
    }
}
Libdogecoin Elliptic Curve Key API
Table of Contents
Abstract
This document explains the basic elliptic curve key API within libdogecoin.
Specification
Cited from https://en.bitcoin.it/wiki/Elliptic_Curve_Digital_Signature_Algorithm
Background on ECDSA Signatures
Elliptic Curve Digital Signature Algorithm or ECDSA is a cryptographic algorithm used by Dogecoin to ensure that funds can only be spent by their rightful owners. It is dependent on the curve order and hash function used. For dogecoin these are Secp256k1 and SHA256(SHA256()) respectively.
A few concepts related to ECDSA:
private key: A secret number, known only to the person that generated it. A private key is essentially a randomly generated number. In Dogecoin, someone with the private key that corresponds to funds on the blockchain can spend the funds. In Dogecoin, a private key is a single unsigned 256 bit integer (32 bytes).public key: A number that corresponds to a private key, but does not need to be kept secret. A public key can be calculated from a private key, but not vice versa. A public key can be used to determine if a signature is genuine (in other words, produced with the proper key) without requiring the private key to be divulged. In Dogecoin, public keys are either compressed or uncompressed. Compressed public keys are 33 bytes, consisting of a prefix either 0x02 or 0x03, and a 256-bit integer called x. The older uncompressed keys are 65 bytes, consisting of constant prefix (0x04), followed by two 256-bit integers called x and y (2 * 32 bytes). The prefix of a compressed key allows for the y value to be derived from the x value.signature: A number that proves that a signing operation took place. A signature is mathematically generated from a hash of something to be signed, plus a private key. The signature itself is two numbers known as r and s. With the public key, a mathematical algorithm can be used on the signature to determine that it was originally produced from the hash and the private key, without needing to know the private key. Resulting signatures are either 73, 72, or 71 bytes long (with approximate probabilities of 25%, 50%, and 25%, respectively--although sizes even smaller than that are possible with exponentially decreasing probability).
Primitives
The ECDSA signing and verification algorithms make use of a few fundamental variables which are used to obtain a signature and the reverse process of getting a message from a signature.
rands: These numbers uniquely represent the signature.z: The hash of the message we want to sign. Normally we are required to use the left-most N bits of the message hash, whereNis the length of the hash function used, however, this rule does not apply to dogecoin signatures because the length of the hash function used, SHA256, equals the bit length of the secp256k1 curve (256) so no truncation is necessary.k: A cryptographicly secure random number which is used as a nonce to calculate therandsvalues.dAandQA: These are the private key number and public key point respectively, used to sign and verify the message. Wallets can derive a copy of these when give an address contained inside the wallet.
Verification Algorithm
The verification algorithm ensures that the signature pair r and s, QA and z are all consistent.
- Verify that both
randsare between1andn-1. - Compute
u1 = z*s-1 mod nandu2 = r*s-1 mod n. - Compute
(x, y) = u1*G + u2*QAand ensure it is not equal to the point at infinity. The point at infinity is a special point that results when you add two points whose result would otherwise not lie on the curve, such as two points with the sameXvalue but invertedYvalues. - If
r = x mod nthen the signature is valid. Otherwise, or if any of the checks fail, then the signature is invalid.
Basic Elliptic Curve Key API
eckey:
typedef struct eckey {
    int idx;
    dogecoin_key private_key;
    char private_key_wif[PRIVKEYWIFLEN];
    dogecoin_pubkey public_key;
    char public_key_hex[PUBKEYHEXLEN];
    char address[P2PKHLEN];
    UT_hash_handle hh;
} eckey;
keys:
static eckey *keys = NULL;
This is an empty collection of key structures and meant for internal consumption.
new_eckey:
eckey* new_eckey(dogecoin_bool is_testnet) {
    eckey* key = (struct eckey*)dogecoin_calloc(1, sizeof *key);
    dogecoin_privkey_init(&key->private_key);
    assert(dogecoin_privkey_is_valid(&key->private_key) == 0);
    dogecoin_privkey_gen(&key->private_key);
    assert(dogecoin_privkey_is_valid(&key->private_key)==1);
    dogecoin_pubkey_init(&key->public_key);
    dogecoin_pubkey_from_key(&key->private_key, &key->public_key);
    assert(dogecoin_pubkey_is_valid(&key->public_key) == 1);
    strcpy(key->public_key_hex, utils_uint8_to_hex((const uint8_t *)&key->public_key, 33));
    uint8_t pkeybase58c[34];
    const dogecoin_chainparams* chain = is_testnet ? &dogecoin_chainparams_test : &dogecoin_chainparams_main;
    pkeybase58c[0] = chain->b58prefix_secret_address;
    pkeybase58c[33] = 1; /* always use compressed keys */
    memcpy_safe(&pkeybase58c[1], &key->private_key, DOGECOIN_ECKEY_PKEY_LENGTH);
    assert(dogecoin_base58_encode_check(pkeybase58c, sizeof(pkeybase58c), key->private_key_wif, sizeof(key->private_key_wif)) != 0);
    if (!dogecoin_pubkey_getaddr_p2pkh(&key->public_key, chain, (char*)&key->address)) return false;
    key->idx = HASH_COUNT(keys) + 1;
    return key;
}
This function instantiates a new working key, but does not add it to the hash table.
C usage:
eckey* key = new_eckey(false);
new_eckey_from_privkey:
eckey* new_eckey_from_privkey(char* private_key) {
    eckey* key = (struct eckey*)dogecoin_calloc(1, sizeof *key);
    dogecoin_privkey_init(&key->private_key);
    const dogecoin_chainparams* chain = chain_from_b58_prefix(private_key);
    if (!dogecoin_privkey_decode_wif(private_key, chain, &key->private_key)) return false;
    assert(dogecoin_privkey_is_valid(&key->private_key)==1);
    dogecoin_pubkey_init(&key->public_key);
    dogecoin_pubkey_from_key(&key->private_key, &key->public_key);
    assert(dogecoin_pubkey_is_valid(&key->public_key) == 1);
    strcpy(key->public_key_hex, utils_uint8_to_hex((const uint8_t *)&key->public_key, 33));
    uint8_t pkeybase58c[34];
    pkeybase58c[0] = chain->b58prefix_secret_address;
    pkeybase58c[33] = 1; /* always use compressed keys */
    memcpy_safe(&pkeybase58c[1], &key->private_key, DOGECOIN_ECKEY_PKEY_LENGTH);
    assert(dogecoin_base58_encode_check(pkeybase58c, sizeof(pkeybase58c), key->private_key_wif, sizeof(key->private_key_wif)) != 0);
    if (!dogecoin_pubkey_getaddr_p2pkh(&key->public_key, chain, (char*)&key->address)) return false;
    key->idx = HASH_COUNT(keys) + 1;
    return key;
}
This function instantiates a new working key from a private_key in WIF format, but does not add it to the hash table.
C usage:
char* privkey = "QUtnMFjt3JFk1NfeMe6Dj5u4p25DHZA54FsvEFAiQxcNP4bZkPu2";
eckey* key = new_eckey_from_privkey(privkey);
...

dogecoin_free(key);
add_eckey:
void add_eckey(eckey *key) {
    eckey* key_old;
    HASH_FIND_INT(keys, &key->idx, key_old);
    if (key_old == NULL) {
        HASH_ADD_INT(keys, idx, key);
    } else {
        HASH_REPLACE_INT(keys, idx, key, key_old);
    }
    dogecoin_free(key_old);
}
This function takes a pointer to an existing working eckey object and adds it to the hash table.
C usage:
eckey* key = new_eckey(false);
add_eckey(key);
start_key:
int start_key(dogecoin_bool is_testnet) {
    eckey* key = new_eckey(is_testnet);
    int index = key->idx;
    add_eckey(key);
    return index;
}
This function creates a new eckey, places it in the hash table, and returns the index of the new eckey, starting from 1 and incrementing each subsequent call.
C usage:
int key_id = start_key(false);
find_eckey:
eckey* find_eckey(int idx) {
    eckey* key;
    HASH_FIND_INT(keys, &idx, key);
    return key;
}
This function takes an index and returns the working eckey associated with that index in the hash table.
C usage:
...
int key_id = start_key(false);
eckey* key = find_eckey(key_id);
...
remove_eckey:
void remove_eckey(eckey* key) {
    HASH_DEL(keys, key); /* delete it (keys advances to next) */
    dogecoin_privkey_cleanse(&key->private_key);
    dogecoin_pubkey_cleanse(&key->public_key);
    dogecoin_key_free(key);
}
This function removes the specified working eckey from the hash table and frees the eckey in memory.
C usage:
int key_id = start_key(false);
eckey* key = find_eckey(key_id);
remove_eckey(key)
dogecoin_key_free:
void dogecoin_key_free(eckey* eckey)
{
    dogecoin_free(eckey);
}
This function frees the memory allocated for an eckey.
C usage:
...
dogecoin_key_free(key);
...
Secure Enclaves Integration with libdogecoin
Introduction
This document discusses our research on enhancing the security of libdogecoin key management operations using Intel SGX and ARM TrustZone as secure enclaves. By performing key management within secure enclaves, we significantly reduce the risk of key exposure, thereby increasing the overall security of Dogecoin transactions. This document includes an overview of the research, build instructions for the key management enclaves, and a step-by-step tutorial on using the host command line interface to interact with the enclaves in both OP-TEE and OpenEnclave environments. Additionally, we outline critical vulnerabilities in Trusted Execution Environments (TEEs) and provide recommendations for mitigating these risks.
This document covers mnemonic generation, public key derivation, address generation, message signing, and transaction signing as part of secure enclave operations.
What are Secure Enclaves?
Secure enclaves are isolated environments that provide a secure space for sensitive operations. These enclaves are isolated from the rest of the system, ensuring that sensitive data and operations are protected from unauthorized access. Secure enclaves within a processor can be implemented using different technologies such as TEEs, hardware security modules (HSMs), and virtualization-based solutions. To ensure a robust defense, secure enclaves must guarantee confidentiality, integrity, and availability for sensitive operations. However, enclaves are not a silver bullet and must be integrated within a broader security strategy.
Compared to hardware security modules (HSMs) and trusted platform modules (TPMs), secure enclaves provide in-CPU isolation, which makes them ideal for high-performance cryptographic operations without requiring external hardware.
Why Use Secure Enclaves?
Secure enclaves offer several advantages for key management operations:
- Isolation: Enclaves provide a secure environment that is isolated from the rest of the system, protecting sensitive data and operations.
- Confidentiality: Enclaves ensure that sensitive data is encrypted and protected from unauthorized access.
- Integrity: Enclaves guarantee the integrity of sensitive operations, ensuring that they have not been tampered with.
- Remote Attestation: Enclaves can be remotely attested to verify their integrity and authenticity to external parties.
- Key Management: Enclaves can securely generate, store, and manage cryptographic keys, protecting them from unauthorized access.
By performing key operations within secure enclaves, developers can enhance the security of their applications and protect sensitive data from unauthorized access.
Secure Enclaves in libdogecoin
Key Concepts
In this section, we define some key concepts central to secure enclaves and their implementation.
- Host: The normal world that interacts with the enclave.
- Enclave: The secure world within the CPU where sensitive operations are performed.
- Trusted Execution Environment (TEE): A hardware-based secure environment that protects sensitive operations from external interference and tampering.
- ECALLS: Enclave calls used in OpenEnclave that allow the host to interact with the secure enclave.
- SMCs: Secure Monitor Calls that manage communication between the normal and secure worlds in ARM TrustZone.
- Remote Attestation: The process of verifying the integrity and authenticity of an enclave to a remote party.
By performing key operations such as seedphrase generation, public key derivation, and message and transaction signing within these enclaves, we can greatly reduce the risk of private key exposure, even in the event of a host system compromise.
What are Trusted Execution Environments (TEEs)?
TEEs are secure environments within a processor that provide a trusted execution domain for sensitive operations. They ensure that sensitive data and operations are protected from unauthorized access and tampering. TEEs can be implemented using hardware-based security technologies such as Intel SGX, ARM TrustZone, or other vendor-specific technologies. While they offer significant advantages in terms of isolating critical operations, TEEs also come with their own set of challenges, particularly in terms of addressing vulnerabilities and maintaining performance.
Contrast Between Intel SGX and ARM TrustZone
| Criteria | Intel SGX (OpenEnclave) | ARM TrustZone (OP-TEE) |
|---|---|---|
| Target Platform | Primarily x86 server-class CPUs | Primarily ARM mobile and embedded devices |
| Security Model | Memory encryption and isolated execution | Secure world execution isolated from normal world |
| Key Vulnerabilities | Foreshadow, Plundervolt, SGAxe | CVE-2021-34387, CVE-2020-16273 |
| Performance Overhead | Higher, especially for I/O and large memory use | Lower, better for embedded and mobile devices |
| Use Cases | Server applications, enterprise security | IoT, mobile devices, embedded systems |
Hardware and Software
Intel SGX and OpenEnclave
Intel SGX (Software Guard Extensions) is a hardware-based security technology that creates isolated TEEs within some Intel CPUs. OpenEnclave is an open-source SDK that enables developers to build host and enclave applications that run on Intel SGX. SGX works by partitioning secure memory regions within the CPU that are isolated from the rest of the system, ensuring that sensitive data is protected from unauthorized access. These memory regions are encrypted and authenticated, providing a secure environment for cryptographic operations.
OpenEnclave offers an interface for developing applications that run within SGX enclaves, enabling developers to build secure applications that protect sensitive data and operations. The host interacts with the enclave using ECALLS, allowing the enclave to perform cryptographic operations securely. Remote attestation is used to verify the integrity of the enclave to remote parties, ensuring that the enclave has not been tampered with.
ARM TrustZone and OP-TEE
ARM TrustZone is another hardware-based security technology that creates TEEs within ARM CPUs. OP-TEE (Open Portable Trusted Execution Environment) is an open-source software framework that facilitates the development of applications running within ARM TrustZone enclaves. TrustZone creates a secure world and a normal world within the CPU, isolating sensitive operations from the rest of the system. The processor switches between the secure and normal worlds, ensuring that sensitive operations are performed securely. Memory is partitioned between the secure and normal worlds using page tables, protecting sensitive data from unauthorized access.
OP-TEE provides a secure world OS for cryptographic operations in TrustZone firmware, ensuring that private keys and sensitive data are protected from unauthorized access. The host interacts with the secure world using SMCs, allowing the secure enclave to perform cryptographic operations securely. OP-TEE is widely used in IoT devices, mobile phones, and embedded systems to protect sensitive data and operations.
Key Management Enclaves
Visual Representation (Simplified)
+-----------------------------------------+               +-----------------------------------------+
| Host                                    |               | Host                                    |
|                                         |               |                                         |
|  +-----------------------------------+  |               |  +-----------------------------------+  |
|  |      command line interface       |  |               |  |      command line interface       |  |
|  |                                   |  |               |  |                                   |  |
|  |  +-----------------------------+  |  |               |  |  +-----------------------------+  |  |
|  |  |         libdogecoin         |  |  |               |  |  |         libdogecoin         |  |  |
|  +-----------------------------------+  |               |  +-----------------------------------+  |
|  |         OpenEnclave Host          |  |               |  |           OP-TEE Client           |  |
+-----------------------------------------+               +-----------------------------------------+
|                Linux OS                 |               |                Linux OS                 |
+-----------------------------------------+               +-----------------------------------------+
| Enclave            ^                    |               | Enclave            ^                    |
|                 ECALLS                  |               |                   SMCs                  |
|                    |                    |               |                    |                    |
|        Messages and Transactions        |               |        Messages and Transactions        |
|        Public Keys and Addresses        |               |        Public Keys and Addresses        |
|                    |                    |               |                    |                    |
|                    v                    |               |                    v                    |
|  +-----------------------------------+  |               |  +-----------------------------------+  |
|  |          Key Management           |  |               |  |          Key Management           |  |
|  |  - Seedphrase Generation          |  |               |  |  - Seedphrase Generation          |  |
|  |  - Public Key Generation          |  |               |  |  - Public Key Generation          |  |
|  |  - Address Generation             |  |               |  |  - Address Generation             |  |
|  |  - Sign Message                   |  |               |  |  - Sign Message                   |  |
|  |  - Sign Transaction               |  |               |  |  - Sign Transaction               |  |
|  |                                   |  |               |  |                                   |  |
|  |  +-----------------------------+  |  |               |  |  +-----------------------------+  |  |
|  |  |         libdogecoin         |  |  |               |  |  |         libdogecoin         |  |  |
+-----------------------------------------+               +-----------------------------------------+
|              OpenEnclave                |               |       OP-TEE OS + Trusted Firmware      |
+-----------------------------------------+               +-----------------------------------------+
|               Intel SGX                 |               |             ARMv8 TrustZone             |
+-----------------------------------------+               +-----------------------------------------+
Key Management Operations
The secure enclave handles the following operations:
- Seedphrase Generation: Protecting the creation of seedphrases for wallet recovery.
- Public Key Generation: Deriving public keys in the enclave, ensuring private keys are never exposed.
- Address Generation: Generating secure Dogecoin addresses within the enclave.
- Sign Message/Transaction: Ensuring the integrity and authenticity of signed messages and transactions.
Limitations and Assumptions
While secure enclaves provide powerful protection, they are not infallible. The Foreshadow vulnerability is a good example of how attackers can bypass enclave protections. Furthermore, the security model assumes that the host environment is insecure, relying entirely on the enclave for protection. Developers should adopt a defense-in-depth strategy, using secure coding practices and regular security audits to complement enclave security.
Performance trade-offs
Secure enclaves introduce performance overhead due to the encryption and isolation mechanisms they employ. For example, Intel SGX enclaves have higher performance overhead compared to ARM TrustZone enclaves, especially for I/O and large memory use. ARM TrustZone enclaves are better suited for embedded and mobile devices due to their lower performance impact. However key management operations are typically not performance-critical, making secure enclave protection a worthwhile trade-off for the increased security it provides.
Secure Storage
Mnemonic seedphrases are securely encrypted by the enclave to prevent unauthorized access. Encrypted data should still be backed up using the rule of three: store copies in three distinct locations to ensure recovery.
Time-Based One-Time Password (TOTP) Authentication
TOTP authentication using a YubiKey further enhances security by ensuring that access to sensitive enclave operations is restricted to authorized users. When combined with password-based authentication, TOTP provides an additional layer of security. This two-factor authentication approach increases security during enclave operations, preventing unauthorized key usage even if the host environment is compromised.
Future Research
To further improve the security and functionality of Dogecoin’s ecosystem, we recommend exploring Remote Attestation to validate the integrity of enclaves in distributed systems. This would allow external parties to verify the authenticity of enclaves, ensuring that they have not been tampered with. Intel SGX supports remote attestation, while ARM TrustZone can be extended to include this feature.
Performance optimizations for secure enclaves are another area of interest, as reducing overhead can make enclaves more practical for a wider range of applications. Additonal analysis is needed to evaluate the performance impact of secure enclaves on key management operations at scale.
Additionally, alternative secure technologies like AMD SEV and RISC-V should be explored to broaden the options available for TEE-based applications. These technologies offer different security models and performance characteristics that may be better suited to specific use cases.
References
TEE Vulnerabilities
It is crucial to keep systems up-to-date with the latest security fixes and patches to mitigate the risks associated with any vulnerabilities. Regularly applying security patches and following best practices for secure enclave development can help protect sensitive data and operations. Below are some recent vulnerabilities that have been discovered in Intel SGX, ARM TrustZone, OpenEnclave, and OP-TEE. It is essential to stay informed about these vulnerabilities and take appropriate measures to address them.
Intel SGX: Several vulnerabilities have been discovered in Intel SGX:
-
Foreshadow (CVE-2018-3615): This vulnerability allows attackers to access sensitive information stored in SGX enclaves. Details can be found in the Intel Security Advisory.
-
Plundervolt (CVE-2019-11157): This vulnerability exploits the CPU's undervolting features to breach SGX enclave protections. More information is available in the Intel Security Advisory.
-
SGAxe (CVE-2020-0551): This vulnerability allows side-channel attacks to extract sensitive information from SGX enclaves. Refer to the Intel Security Advisory for further details.
ARM TrustZone: While many vulnerabilities related to ARM TrustZone tend to be vendor-specific or related to specific implementations, the core TrustZone architecture itself has also been associated with certain security concerns. Below are examples of both types:
-
CVE-2021-34387: This vulnerability in the ARM TrustZone technology, on which Trusty is based, allows unauthorized write access to kernel code and data that is mapped as read-only, affecting the DRAM reserved for TrustZone. Further details can be found here.
-
CVE-2021-33478: This issue affects Broadcom MediaxChange firmware, potentially allowing an unauthenticated attacker to achieve arbitrary code execution in the TrustZone TEE of an affected device. More information is available here.
-
CVE-2021-29415: This vulnerability involves the ARM TrustZone CryptoCell 310 in Nordic Semiconductor nRF52840, allowing adversaries to recover private ECC keys during ECDSA operations. Details can be found here.
-
CVE-2020-16273: This vulnerability in ARMv8-M processors' software stack selection mechanism can be exploited by a stack-underflow attack, allowing changes to the stack pointer from a non-secure application. More information is available here.
-
CVE-2022-47549: This issue in OP-TEE, which is closely associated with ARM TrustZone, allows bypassing signature verification and installing malicious trusted applications via electromagnetic fault injections. More details are available here.
It's important to recognize that while TrustZone provides a secure environment, its effectiveness is heavily dependent on how it is implemented and integrated with other system components. Architectural issues or specific use-case vulnerabilities may arise, emphasizing the need for rigorous security practices.
OpenEnclave: For vulnerabilities and security advisories related to OpenEnclave, refer to their GitHub security page.
OP-TEE: For vulnerabilities and security advisories related to OP-TEE, refer to their GitHub security page.
To mitigate the risks associated with these vulnerabilities, it is essential to stay informed about the latest security advisories and best practices for secure enclave development. Regularly applying security patches and following secure coding practices can help protect sensitive data and operations from unauthorized access.
Disclaimer
Enclaves are not a silver bullet. As a risk mitigation measure, enclaves can provide significant benefits in protecting sensitive data and operations. We encourage developers to explore secure enclaves and their potential benefits, but caution that they should be used as part of a comprehensive security strategy that includes other security measures such as secure coding practices and audits. Enclaves are not immune to vulnerabilities, and it is essential to stay informed about the latest security advisories and best practices for secure enclave development.
Build Instructions
Building OP-TEE SDK and Client
Dependencies
- Ubuntu 20.04 or later
- Docker
- Libdogecoin
sudo apt-get install docker.io

mkdir -p /doge
cd /doge
git clone https://github.com/dogecoinfoundation/libdogecoin.git
cd libdogecoin
The SDK has several components and requires over 10GB of disk space to build. The build process can take over 30 minutes on a modern machine. Docker is used to build the SDK and client in a clean environment.
Step 1 (NanoPC): Building OP-TEE SDK and Client
This command builds the latest SDK and client for NanoPC-T6 (nanopc-t6.xml). When complete, the image will be located in /doge/libdogecoin/optee/out/nanopc-t6.img. Burn this image to an SD card to boot the NanoPC-T6. Connect an Ethernet cable, USB keyboard and HDMI to the NanoPC-T6 and power it on. The default IP address is configured using DHCP. Login as root via ssh (e.g. ssh root@192.168.137.19) or using the HDMI console.
LINUX_MODULES=y is used to build the Linux kernel modules. The CFG_TEE_CORE_LOG_LEVEL=0 environment variable sets the log level to 0 (no logging). The CFG_ATTESTATION_PTA=y environment variable enables the attestation PTA. The CFG_ATTESTATION_PTA_KEY_SIZE=1024 environment variable sets the attestation PTA key size to 1024 bits. The CFG_WITH_USER_TA=y environment variable enables user TAs. The CFG_WITH_SOFTWARE_PRNG=n environment variable enables the hardware PRNG.
An RSA private key is generated and overwrites the default Trusted Application (TA) key. This key is used to sign the enclave binaries during development. In the Continuous Integration (CI) environment, an Actions secret is used. Subkeys are generated for testing purposes but are not used to sign the enclave binaries.
docker pull jforissier/optee_os_ci:qemu_check
docker run -v "$(pwd):/src" -w /src jforissier/optee_os_ci:qemu_check /bin/bash -c "\
    # Set up the environment and build the OP-TEE SDK
    set -e && \
    apt update && \
    apt -y upgrade && \
    apt -y install libusb-1.0-0-dev swig python3-dev python3-setuptools e2tools && \
    curl https://storage.googleapis.com/git-repo-downloads/repo > /bin/repo && chmod a+x /bin/repo && \
    mkdir -p optee && \
    cd optee && \
    # repo init -u https://github.com/OP-TEE/manifest.git -m qemu_v8.xml -b 4.0.0
    repo init -u https://github.com/OP-TEE/manifest.git -m nanopc-t6.xml -b master && \
    export FORCE_UNSAFE_CONFIGURE=1 && \
    repo sync -j 4 --force-sync && \
    cd build && \
    make toolchains -j 4 && \
    export CFG_TEE_CORE_LOG_LEVEL=0 && \
    export CFG_ATTESTATION_PTA=y && \
    export CFG_ATTESTATION_PTA_KEY_SIZE=1024 && \
    export CFG_WITH_USER_TA=y && \
    export CFG_WITH_SOFTWARE_PRNG=n && \

    # Generate RSA private key and overwrite the default TA key
    openssl genpkey -algorithm RSA -out rsa_private.pem -pkeyopt rsa_keygen_bits:2048 && \
    mv rsa_private.pem /src/optee/optee_os/keys/default_ta.pem && \

    # Generate subkeys
    openssl genrsa -out /src/optee/optee_test/ta/top_level_subkey.pem && \
    openssl genrsa -out /src/optee/optee_test/ta/mid_level_subkey.pem && \
    openssl genrsa -out /src/optee/optee_test/ta/identity_subkey2.pem && \

    # Sign the top-level subkey with the root key
    /src/optee/optee_os/scripts/sign_encrypt.py sign-subkey \
        --uuid f04fa996-148a-453c-b037-1dcfbad120a6 \
        --key /src/optee/optee_os/keys/default_ta.pem --in /src/optee/optee_test/ta/top_level_subkey.pem \
        --out /src/optee/optee_test/ta/top_level_subkey.bin --max-depth 4 --name-size 64 \
        --subkey-version 1 && \

    # Generate UUID for the mid-level subkey
    /src/optee/optee_os/scripts/sign_encrypt.py subkey-uuid --in /src/optee/optee_test/ta/top_level_subkey.bin \
        --name mid_level_subkey && \

    # Sign the mid-level subkey with the top-level subkey
    /src/optee/optee_os/scripts/sign_encrypt.py sign-subkey \
        --uuid 1a5948c5-1aa0-518c-86f4-be6f6a057b16 \
        --key /src/optee/optee_test/ta/top_level_subkey.pem --subkey /src/optee/optee_test/ta/top_level_subkey.bin \
        --name-size 64 --subkey-version 1 \
        --name mid_level_subkey \
        --in /src/optee/optee_test/ta/mid_level_subkey.pem --out /src/optee/optee_test/ta/mid_level_subkey.bin && \

    # Generate UUID for subkey1_ta
    /src/optee/optee_os/scripts/sign_encrypt.py subkey-uuid --in /src/optee/optee_test/ta/mid_level_subkey.bin \
        --name subkey1_ta && \

    # Sign the identity subkey2 with the root key
    /src/optee/optee_os/scripts/sign_encrypt.py sign-subkey \
        --uuid a720ccbb-51da-417d-b82e-e5445d474a7a \
        --key /src/optee/optee_os/keys/default_ta.pem --in /src/optee/optee_test/ta/identity_subkey2.pem \
        --out /src/optee/optee_test/ta/identity_subkey2.bin --max-depth 0 --name-size 0 \
        --subkey-version 1 && \

    # Build and test the OP-TEE OS and client
    # make -j 4 check
    make LINUX_MODULES=y -j 4 && \
    cd /src && \
    [ ! -d optee_client ] && git clone https://github.com/OP-TEE/optee_client.git && \
    cd optee_client && \
    mkdir -p build && \
    cd build && \
    export PATH=/src/optee/toolchains/aarch64/bin:$PATH && \
    export CC=aarch64-linux-gnu-gcc && \
    cmake .. -DCMAKE_C_COMPILER=aarch64-linux-gnu-gcc -DCMAKE_INSTALL_PREFIX=/src/optee/toolchains/aarch64 && \
    make -j 4 VERBOSE=1 && \
    make install"
Step 1 (QEMU): Building OP-TEE SDK and Client
This command builds the SDK (version 4.0.0) and client for ARMv8 QEMU emulation (qemu_v8.xml). For other platforms, change the manifest file in the repo init command accordingly. Replace 4.0.0 with the desired version and qemu_v8.xml with the desired platform. Refer to the OP-TEE documentation for more information.
docker pull jforissier/optee_os_ci:qemu_check
docker run -v "$(pwd):/src" -w /src jforissier/optee_os_ci:qemu_check /bin/bash -c "\
    # Set up the environment and build the OP-TEE SDK
    set -e && \
    apt update && \
    apt -y upgrade && \
    apt -y install libusb-1.0-0-dev swig python3-dev python3-setuptools e2tools && \
    curl https://storage.googleapis.com/git-repo-downloads/repo > /bin/repo && chmod a+x /bin/repo && \
    mkdir -p optee && \
    cd optee && \
    repo init -u https://github.com/OP-TEE/manifest.git -m qemu_v8.xml -b 4.0.0 && \
    export FORCE_UNSAFE_CONFIGURE=1 && \
    repo sync -j 4 --force-sync && \
    patch -N -F 4 /src/optee/build/common.mk < /src/src/optee/common.mk.patch && \
    cd build && \
    make toolchains -j 4 && \
    export CFG_TEE_CORE_LOG_LEVEL=0 && \
    export CFG_ATTESTATION_PTA=y && \
    export CFG_ATTESTATION_PTA_KEY_SIZE=1024 && \
    export CFG_WITH_USER_TA=y && \

    # Generate RSA private key and overwrite the default TA key
    openssl genpkey -algorithm RSA -out rsa_private.pem -pkeyopt rsa_keygen_bits:2048 && \
    mv rsa_private.pem /src/optee/optee_os/keys/default_ta.pem && \

    # Generate subkeys
    openssl genrsa -out /src/optee/optee_test/ta/top_level_subkey.pem && \
    openssl genrsa -out /src/optee/optee_test/ta/mid_level_subkey.pem && \
    openssl genrsa -out /src/optee/optee_test/ta/identity_subkey2.pem && \

    # Sign the top-level subkey with the root key
    /src/optee/optee_os/scripts/sign_encrypt.py sign-subkey \
        --uuid f04fa996-148a-453c-b037-1dcfbad120a6 \
        --key /src/optee/optee_os/keys/default_ta.pem --in /src/optee/optee_test/ta/top_level_subkey.pem \
        --out /src/optee/optee_test/ta/top_level_subkey.bin --max-depth 4 --name-size 64 \
        --subkey-version 1 && \

    # Generate UUID for the mid-level subkey
    /src/optee/optee_os/scripts/sign_encrypt.py subkey-uuid --in /src/optee/optee_test/ta/top_level_subkey.bin \
        --name mid_level_subkey && \

    # Sign the mid-level subkey with the top-level subkey
    /src/optee/optee_os/scripts/sign_encrypt.py sign-subkey \
        --uuid 1a5948c5-1aa0-518c-86f4-be6f6a057b16 \
        --key /src/optee/optee_test/ta/top_level_subkey.pem --subkey /src/optee/optee_test/ta/top_level_subkey.bin \
        --name-size 64 --subkey-version 1 \
        --name mid_level_subkey \
        --in /src/optee/optee_test/ta/mid_level_subkey.pem --out /src/optee/optee_test/ta/mid_level_subkey.bin && \

    # Generate UUID for subkey1_ta
    /src/optee/optee_os/scripts/sign_encrypt.py subkey-uuid --in /src/optee/optee_test/ta/mid_level_subkey.bin \
        --name subkey1_ta && \

    # Sign the identity subkey2 with the root key
    /src/optee/optee_os/scripts/sign_encrypt.py sign-subkey \
        --uuid a720ccbb-51da-417d-b82e-e5445d474a7a \
        --key /src/optee/optee_os/keys/default_ta.pem --in /src/optee/optee_test/ta/identity_subkey2.pem \
        --out /src/optee/optee_test/ta/identity_subkey2.bin --max-depth 0 --name-size 0 \
        --subkey-version 1 && \

    # Build and test the OP-TEE OS and client
    make -j 4 check
    cd /src && \
    [ ! -d optee_client ] && git clone https://github.com/OP-TEE/optee_client.git && \
    cd optee_client && \
    mkdir -p build && \
    cd build && \
    export PATH=/src/optee/toolchains/aarch64/bin:$PATH && \
    export CC=aarch64-linux-gnu-gcc && \
    cmake .. -DCMAKE_C_COMPILER=aarch64-linux-gnu-gcc -DCMAKE_INSTALL_PREFIX=/src/optee/toolchains/aarch64 && \
    make -j 4 VERBOSE=1 && \
    make install"
Step 2 (QEMU or NanoPC): Building OP-TEE Libdogecoin Key Manager Enclave
This command builds the OP-TEE Libdogecoin Key Manager Enclave for QEMU ARMv8 or NanoPC-T6. The enclave is built using the OP-TEE SDK and client. The enclave binary is located in /doge/libdogecoin/optee/out/bin/libdogecoin.img.
Note that libdogecoin is built twice: once for the host and once for OP-TEE. The host build is used to build the host application, while the OP-TEE build is used to build the enclave. The CFLAGS=-Wp,-D_FORTIFY_SOURCE=0 flag is used to disable fortify source checks, which are not supported by OP-TEE.
docker run --privileged -v "$(pwd):/src" -w /src jforissier/optee_os_ci:qemu_check /bin/bash -c "\
    # Set up the environment and build libdogecoin
    apt-get update && \
    apt-get install -y autoconf automake libtool-bin build-essential curl python3 valgrind g++-aarch64-linux-gnu qemu-user-static qemu-user && \

    # Build libdogecoin for Host
    make -j 4 -C depends HOST=aarch64-linux-gnu && \
    ./autogen.sh && \
    ./configure --prefix=/src/depends/aarch64-linux-gnu LIBS=-levent_pthreads --enable-static --disable-shared --enable-test-passwd HOST=aarch64-linux-gnu && \
    make -j 4 && \
    make install && \

    export PATH=/src/optee/toolchains/aarch64/bin:$PATH && \
    export CC=aarch64-linux-gnu-gcc && \

    # Build the Host
    cd /src/src/optee/host && \
    make -j 4 \
      CROSS_COMPILE=aarch64-linux-gnu- \
      LDFLAGS=\"-L/src/optee/toolchains/aarch64/lib -L/src/depends/aarch64-linux-gnu/lib -ldogecoin -lunistring\" \
      CFLAGS=\"-I/src/optee/toolchains/aarch64/include -I/src/src/optee/ta/include -I/src/depends/aarch64-linux-gnu/include -I/src/depends/aarch64-linux-gnu/include/ykpers-1 -I/src/depends/aarch64-linux-gnu/include/dogecoin\" && \

    # Build libdogecoin for OP-TEE
    cd /src/ && \
    make -j 4 -C depends CFLAGS=-Wp,-D_FORTIFY_SOURCE=0 HOST=aarch64-linux-gnu && \
    ./configure --prefix=/src/depends/aarch64-linux-gnu LIBS=-levent_pthreads --enable-static --disable-shared --enable-test-passwd --enable-optee CFLAGS=-Wp,-D_FORTIFY_SOURCE=0 HOST=aarch64-linux-gnu && \
    make -j 4 && \
    make install && \

    # Build the Enclave
    cd /src/src/optee/ta && \
    make -j 4 \
      CROSS_COMPILE=aarch64-linux-gnu- \
      LIBDIR=/src/depends/aarch64-linux-gnu/lib \
      LDFLAGS=\"-L/src/depends/aarch64-linux-gnu/lib -ldogecoin -lunistring\" \
      CFLAGS=\"-I/src/depends/aarch64-linux-gnu/include -I/src/depends/aarch64-linux-gnu/include/dogecoin\" \
      PLATFORM=vexpress-qemu_armv8a \
      TA_DEV_KIT_DIR=/src/optee/optee_os/out/arm/export-ta_arm64 && \

    # Create symbolic links and prepare image
    mkdir -p /src/optee/out/bin && \
    cd /src/optee/out/bin && \
    ln -sf ../../linux/arch/arm64/boot/Image Image && \
    ln -sf ../../trusted-firmware-a/build/qemu/release/bl1.bin bl1.bin && \
    ln -sf ../../trusted-firmware-a/build/qemu/release/bl2.bin bl2.bin && \
    ln -sf ../../trusted-firmware-a/build/qemu/release/bl31.bin bl31.bin && \
    ln -sf ../../optee_os/out/arm/core/tee-header_v2.bin bl32.bin && \
    ln -sf ../../optee_os/out/arm/core/tee-pager_v2.bin bl32_extra1.bin && \
    ln -sf ../../optee_os/out/arm/core/tee-pageable_v2.bin bl32_extra2.bin && \
    ln -sf ../../edk2/Build/ArmVirtQemuKernel-AARCH64/RELEASE_GCC5/FV/QEMU_EFI.fd bl33.bin && \
    ln -sf ../../out-br/images/rootfs.cpio.gz rootfs.cpio.gz && \
    dd if=/dev/zero of=/src/optee/out/bin/libdogecoin.img bs=1M count=32 && \
    mkfs.ext4 /src/optee/out/bin/libdogecoin.img && \
    mkdir -p /src/optee/out-br/mnt && \
    mount -o loop /src/optee/out/bin/libdogecoin.img /src/optee/out-br/mnt && \
    cp /src/src/optee/ta/*.ta /src/optee/out-br/mnt && \
    cp /src/src/optee/host/optee_libdogecoin /src/optee/out-br/mnt && \
    cp /src/spvnode /src/optee/out-br/mnt && \
    cp /src/sendtx /src/optee/out-br/mnt && \
    cp /src/such /src/optee/out-br/mnt && \
    cp /src/tests /src/optee/out-br/mnt && \
    cp /src/bench /src/optee/out-br/mnt && \
    mkdir -p /src/optee/out-br/mnt/data/tee && \
    umount /src/optee/out-br/mnt && \
    exit"
Step 3 (NanoPC): Running OP-TEE Libdogecoin Key Manager Enclave
Use scp to copy the /doge/libdogecoin/optee/out/bin/libdogecoin.img to the NanoPC-T6 (e.g. scp /doge/libdogecoin/optee/out/bin/libdogecoin.img root@192.168.137.19:/root/). Then, SSH into the NanoPC-T6 and run the following commands:
mkdir /media/libdogecoin
mount /root/libdogecoin.img /media/libdogecoin
cd /media/libdogecoin
cp /media/libdogecoin/62d95dc0-7fc2-4cb3-a7f3-c13ae4e633c4.ta /lib/optee_armtz/
./optee_libdogecoin -c generate_mnemonic
Step 3 (QEMU): Running OP-TEE Libdogecoin Key Manager Enclave
docker run --privileged -v /dev/bus/usb:/dev/bus/usb -it -v "$(pwd):/src" -w /src jforissier/optee_os_ci:qemu_check /bin/bash -c "\
  chmod 777 /src/optee/qemu/build/aarch64-softmmu/qemu-system-aarch64 && \
  cd /src/optee/out/bin && \
  /src/optee/qemu/build/aarch64-softmmu/qemu-system-aarch64 \
    -L /src/optee/qemu/pc-bios \
    -nographic \
    -serial mon:stdio \
    -serial file:/src/optee/serial1.log \
    -smp 2 \
    -machine virt,secure=on,mte=off,gic-version=3 \
    -cpu max,pauth-impdef=on \
    -d unimp \
    -semihosting-config enable=on,target=native \
    -m 1057 \
    -bios bl1.bin \
    -initrd rootfs.cpio.gz \
    -kernel Image \
    -no-acpi \
    -drive file=libdogecoin.img,format=raw,id=libdogecoin,if=none \
    -device virtio-blk-device,drive=libdogecoin \
    -append 'console=ttyAMA0,38400 keep_bootcon root=/dev/vda2' \
    -usb \
    -device pci-ohci,id=ohci \
    -device usb-host,vendorid=0x1050,productid=0x0407"
-v /dev/bus/usb:/dev/bus/usb is used to pass the USB bus and YubiKey device to the container. The -device usb-host,vendorid=0x1050,productid=0x0407 flag is used to pass the YubiKey to the QEMU VM. Replace 0x1050 and 0x0407 with the YubiKey's vendor and product IDs.
The QEMU ARMv8 emulator will boot the OP-TEE OS and Trusted Firmware, and the libdogecoin TA will be loaded into the enclave. The host application can then interact with the enclave to perform key management operations.
In the QEMU terminal, run the following commands to start the libdogecoin TA:
# Mount the drive and copy the TA, host application, and data if needed
mkdir /mnt/libdogecoin && \
mount /dev/vda /mnt/libdogecoin && \
cp /mnt/libdogecoin/62d95dc0-7fc2-4cb3-a7f3-c13ae4e633c4.ta /lib/optee_armtz/ && \
cp /mnt/libdogecoin/optee_libdogecoin /usr/bin/ && \
if [ "$(ls -A /mnt/libdogecoin/data/tee/)" ]; then
  cp /mnt/libdogecoin/data/tee/* /data/tee/ && \
  chown tee:tee /data/tee/*; \
fi
cd /usr/bin/ && \
chmod 777 optee_libdogecoin
chmod 644 /lib/optee_armtz/62d95dc0-7fc2-4cb3-a7f3-c13ae4e633c4.ta

# Run the OP-TEE Libdogecoin Key Manager Enclave (see tutorial for commands)
optee_libdogecoin -c generate_mnemonic

# When finished, copy the data back to the drive
cp -r /data/tee/* /mnt/libdogecoin/data/tee/

# Unmount the drive and power off the system
umount /mnt/libdogecoin
poweroff
Building OpenEnclave Libdogecoin Key Manager Enclave
Dependencies
- Ubuntu 20.04 or later
- Docker
- Libdogecoin
sudo apt-get install docker.io

mkdir -p /doge
cd /doge
git clone https://github.com/dogecoinfoundation/libdogecoin.git
cd libdogecoin
This command uses package installs for the OpenEnclave SDK and Docker to build the OpenEnclave Libdogecoin Key Manager Enclave. Docker is used to build the enclave in a clean environment. Refer to the OpenEnclave documentation for more information.
docker run --device /dev/sgx_enclave:/dev/sgx_enclave --device /dev/sgx_provision:/dev/sgx_provision -it -v $PWD:/src -w /src ubuntu:20.04 bash -c "\
  # Set up the environment and build libdogecoin
  export DEBIAN_FRONTEND=noninteractive && \
  apt-get update && \
  apt-get install -y autoconf automake libtool-bin build-essential curl python3 valgrind python3-dev python3-dbg pkg-config && \
  cd /src && \

  # Build libdogecoin for Enclave
  make -j 4 -C depends HOST=x86_64-pc-linux-gnu && \
  ./autogen.sh && \
  ./configure --prefix=/src/depends/x86_64-pc-linux-gnu --enable-openenclave --enable-test-passwd CFLAGS=-Wp,-D_FORTIFY_SOURCE=0 && \
  make && \
  make install && \

  # Build libdogecoin for Host
  make -j 4 -C depends HOST=x86_64-pc-linux-gnu/host && \
  ./configure --prefix=/src/depends/x86_64-pc-linux-gnu/host --enable-test-passwd && \
  make && \
  make install && \

  # Set up the OpenEnclave environment and build the enclave
  apt-get install -y wget gnupg2 cmake && \
  echo 'deb [arch=amd64] https://download.01.org/intel-sgx/sgx_repo/ubuntu focal main' | tee /etc/apt/sources.list.d/intel-sgx.list && \
  wget -qO - https://download.01.org/intel-sgx/sgx_repo/ubuntu/intel-sgx-deb.key | apt-key add - && \
  echo 'deb http://apt.llvm.org/focal/ llvm-toolchain-focal-11 main' | tee /etc/apt/sources.list.d/llvm-toolchain-focal-11.list && \
  wget -qO - https://apt.llvm.org/llvm-snapshot.gpg.key | apt-key add - && \
  echo 'deb [arch=amd64] https://packages.microsoft.com/ubuntu/20.04/prod focal main' | tee /etc/apt/sources.list.d/msprod.list && \
  wget -qO - https://packages.microsoft.com/keys/microsoft.asc | apt-key add - && \
  apt update && \
  apt -y install clang-11 libssl-dev gdb libsgx-enclave-common libsgx-quote-ex libprotobuf17 libsgx-dcap-ql libsgx-dcap-ql-dev az-dcap-client open-enclave && \
  apt -y install dkms && \
  source /opt/openenclave/share/openenclave/openenclaverc && \
  mkdir -p /src/src/openenclave/build && cd /src/src/openenclave/build && \
  cmake .. && make && make run && \
  exec bash"
Once the build is complete, see the OpenEnclave Host Command Line Tutorial below for instructions on running the OpenEnclave Libdogecoin Key Manager Enclave.
Host Command Line Tutorials
In this section, we provide a step-by-step tutorial on using the host command line interface to interact with the key management enclaves in both environments. This tutorial will cover the basic operations including generating mnemonic seedphrases, generating public keys, generating addresses, signing messages, and signing transactions.
Prerequisites
Before proceeding, ensure you have successfully built and set up the OP-TEE and OpenEnclave environments as described in the previous sections.
OP-TEE Host Command Line Tutorial
Generating a Mnemonic Seedphrase
Generate a mnemonic seedphrase for backup and recovery purposes. This is the first step in creating a new wallet. It will only be displayed once, so make sure to back it up.
This command will generate a mnemonic seedphrase and display it on the screen. Either a shared secret for TOTP or a password must be provided. All other flags are optional, and the user will be prompted for input if not provided.
Enter the shared secret for TOTP when prompted if enabled. The shared secret must be 40 hex characters (e.g., f38243e0e3e97a5c8aa5cc481a815add6c119648). If no shared secret is provided, a random one will be generated. The shared secret will be set on the YubiKey (if present) by the host application, and the mnemonic will be generated and displayed. If OTP Slot 1 is already programmed, the host application will prompt you to overwrite it. Ensure that your YubiKey slot configuration is not overwritten unless intended.
optee_libdogecoin -c generate_mnemonic -n <mnemonic_input> -s <shared_secret> -e <entropy_size> -p <password> -f <flags> -z
The -n flag is used to provide the mnemonic input for recovery purposes if needed. Replace <mnemonic_input> with the mnemonic seedphrase you want to use for recovery. If no mnemonic input is provided, the enclave will generate a random mnemonic seedphrase.
The -s flag is used to provide the shared secret for TOTP authentication from command line instead of prompting the user. Replace <shared_secret> with the shared secret you want to use for TOTP authentication.
The -e flag is used to provide the entropy size for the mnemonic seedphrase. Replace <entropy_size> with the desired entropy size in bits. If no entropy size is provided, the default value of "256" bits (24 words) will be used.
The -p flag is used to provide the password for the mnemonic seedphrase. Replace <password> with the password you want to use for the mnemonic seedphrase.
The -f flag is used to provide additional flags for the mnemonic seedphrase. Replace <flags> with the desired flags for the mnemonic seedphrase. The "delegate" flag is used to delegate account keys to a third party.
The -z flag is used to enable YubiKey authentication. If the YubiKey is present, the shared secret will be set on the YubiKey.
Generating an Extended Public Key
Generate an extended public key using the account and change level. The change level can be set to 0 for external addresses and 1 for internal addresses. The account number is the BIP-44 account. The public key will be derived from the seedphrase stored within the enclave.
The -o flag is used to provide the account number for the extended public key. Replace <account_number> with the desired account number.
The -l flag is used to provide the change level for the extended public key. Replace <change_level> with the desired change level.
The -h flag is used to provide a custom path for the extended public key. Replace <custom_path> with the desired path for the extended public key.
The -a flag is used to provide the auth token if a Yubikey is not present. Use a tool like oathtool to generate TOTP (*e.g., oathtool --totp "f38243e0e3e97a5c8aa5cc481a815add6c119648").
The -p flag is used to provide the password for the mnemonic seedphrase.
The -z flag is used to enable YubiKey authentication. If the YubiKey is present, the TOTP code will be retrieved from the YubiKey and used as the authentication token.
optee_libdogecoin -c generate_extended_public_key -o <account_number> -l <change_level> -h <custom_path> -a <auth_token> or -p <password> -z
Generating an Address
Generate a Dogecoin address using the account, address index, and change level.
optee_libdogecoin -c generate_address -o <account_number> -l <change_level> -i <address_index> -h <custom_path> -a <auth_token> or -p <password> -z
Replace <account_number>, <address_index>, and <change_level> with appropriate values. The change level can be set to 0 for external addresses and 1 for internal addresses. The account number is the BIP-44 account. The address index is the index of the address within the account. The address will be derived from the seedphrase stored within the enclave.
Signing a Message
Sign a message using the private key stored within the enclave. The message will be signed using the private key derived from the seedphrase stored within the enclave. If no message is provided, an example message will be signed for demonstration purposes.
optee_libdogecoin -c sign_message -o <account_number> -l <change_level> -i <address_index> -m <message> -h <custom_path> -a <auth_token> or -p <password> -z
Replace <message> with the message you want to sign.
Signing a Transaction
Sign a raw transaction using the private key stored within the enclave. The transaction will be signed using the private key derived from the seedphrase stored within the enclave. A raw transaction is a hexadecimal string representing the transaction data. Currently, if no transaction data is provided, an example transaction will be signed for demonstration purposes.
optee_libdogecoin -c sign_transaction -o <account_number> -l <change_level> -i <address_index> -t <raw_transaction> -h <custom_path> -a <auth_token> or -p <password> -z
Replace <raw_transaction> with the raw transaction data.
Delegate Key
Delegate account keys to a third party. This operation allows a third party to manage the keys for a specific account. The third party will be able to export the account keys on behalf of the user using the delegate password.
optee_libdogecoin -c delegate_key -o <account_number> -d <delegate_password> -h <custom_path> -a <auth_token> or -p <password> -z
Replace <delegate_password> with the password for the delegate account.
Export Delegate Key
Export the delegated account keys using the delegate password. This operation allows the third party to export the account keys on behalf of the user.
optee_libdogecoin -c export_delegate_key -o <account_number> -d <delegate_password>
Replace <delegate_password> with the password for the delegate account.
OpenEnclave Host Command Line Tutorial
Note: In OpenEnclave, --simulate is used to run the enclave in simulation mode. This is useful for testing without SGX hardware, but it is not secure. For production use, remove --simulate to run on real SGX hardware.
Generating a Mnemonic Seedphrase
Generate a mnemonic seedphrase for backup and recovery purposes. This is the first step in creating a new wallet. It will only be displayed once, so make sure to back it up.
This command will generate a mnemonic seedphrase and display it on the screen. Either a shared secret for TOTP or a password must be provided. All other flags are optional, and the user will be prompted for input if not provided.
Enter the shared secret for TOTP when prompted if enabled. The shared secret must be 40 hex characters (e.g., f38243e0e3e97a5c8aa5cc481a815add6c119648). If no shared secret is provided, a random one will be generated. The shared secret will be set on the YubiKey (if present) by the host application, and the mnemonic will be generated and displayed. If OTP Slot 1 is already programmed, the host application will prompt you to overwrite it.
/doge/libdogecoin/src/openenclave/build/host/host /doge/libdogecoin/src/openenclave/build/enclave/enclave.signed --simulate -c generate_mnemonic -n <mnemonic_input> -s <shared_secret> -e <entropy_size> -p <password> -z
The -n flag is used to provide the mnemonic input for recovery purposes if needed. Replace <mnemonic_input> with the mnemonic seedphrase you want to use for recovery. If no mnemonic input is provided, the enclave will generate a random mnemonic seedphrase.
The -s flag is used to provide the shared secret for TOTP authentication from command line instead of prompting the user. Replace <shared_secret> with the shared secret you want to use for TOTP authentication.
The -e flag is used to provide the entropy size for the mnemonic seedphrase. Replace <entropy_size> with the desired entropy size in bits. If no entropy size is provided, the default value of "256" bits (24 words) will be used.
The -p flag is used to provide the password for the mnemonic seedphrase. Replace <password> with the password you want to use for the mnemonic seedphrase.
The -z flag is used to enable YubiKey authentication. If the YubiKey is present, the shared secret will be set on the YubiKey.
Generating an Extended Public Key
Generate an extended public key using the account and change level. The change level can be set to 0 for external addresses and 1 for internal addresses. The account number is the BIP-44 account.
The TOTP code will be retrieved from the YubiKey (if present) and used as the authentication token for this operation.
/doge/libdogecoin/src/openenclave/build/host/host /doge/libdogecoin/src/openenclave/build/enclave/enclave.signed --simulate -c generate_extended_public_key -o <account_number> -l <change_level> -h <custom_path> -a <auth_token> or -p <password> -z
The -o flag is used to provide the account number for the extended public key. Replace <account_number> with the desired account number.
The -l flag is used to provide the change level for the extended public key. Replace <change_level> with the desired change level.
The -h flag is used to provide a custom path for the extended public key. Replace <custom_path> with the desired path for the extended public key.
The -a flag is used to provide the auth token if a Yubikey is not present. Use a tool like oathtool to generate TOTP (*e.g., oathtool --totp "f38243e0e3e97a5c8aa5cc481a815add6c119648").
The -p flag is used to provide the password for the mnemonic seedphrase.
The -z flag is used to enable YubiKey authentication. If the YubiKey is present, the TOTP code will be retrieved from the YubiKey and used as the authentication token.
Generating an Address
Generate a Dogecoin address using the account, address index, and change level.
/doge/libdogecoin/src/openenclave/build/host/host /doge/libdogecoin/src/openenclave/build/enclave/enclave.signed --simulate -c generate_address -o <account_number> -l <change_level> -i <address_index> -h <custom_path> -a <auth_token> or -p <password> -z
Replace <account_number>, <address_index>, and <change_level> with appropriate values.
Signing a Message
Sign a message using the private key stored within the enclave. If no message is provided, an example message will be signed for demonstration purposes.
/doge/libdogecoin/src/openenclave/build/host/host /doge/libdogecoin/src/openenclave/build/enclave/enclave.signed --simulate -c sign_message -o <account_number> -l <change_level> -i <address_index> -m "This is just a test message" -h <custom_path> -a <auth_token> or -p <password> -z
Replace "This is just a test message" with the message you want to sign.
Signing a Transaction
Sign a raw transaction using the private key stored within the enclave. The transaction will be signed using the private key derived from the seedphrase stored within the enclave. A raw transaction is a hexadecimal string representing the transaction data. Currently, if no transaction data is provided, an example transaction will be signed for demonstration purposes.
/doge/libdogecoin/src/openenclave/build/host/host /doge/libdogecoin/src/openenclave/build/enclave/enclave.signed --simulate -c sign_transaction -o <account_number> -l <change_level> -i <address_index> -t <raw_transaction> -h <custom_path> -a <auth_token> or -p <password> -z
Replace <raw_transaction> with the raw transaction data.
Conclusion
In this document, we explored the integration of libdogecoin with secure enclaves in Trusted Execution Environments (TEEs). We discussed the benefits of using Intel SGX and ARM TrustZone to secure key management operations, including mnemonic seedphrase generation, public key generation, address generation, message signing, and transaction signing. We provided a step-by-step tutorial on using the host command line interface to interact with the key management enclaves in both OP-TEE and OpenEnclave environments. We also outlined critical vulnerabilities in TEEs and provided recommendations for mitigating these risks. We hope this document serves as a valuable resource for developers looking to enhance the security of Dogecoin transactions using secure enclaves.
Libdogecoin SPV REST API Documentation
Table of Contents
Abstract
This document describes the REST API endpoints exposed by the Libdogecoin SPV node. The API provides access to wallet information, such as balance, addresses, transactions, UTXOs, as well as wallet and blockchain data like wallet files, headers, and the chain tip. The API is designed to facilitate interaction with the Libdogecoin SPV node programmatically.
Endpoints
GET /getBalance
Retrieves the total balance of the wallet.
Request
- Method:
GET - URL:
/getBalance
Response
-
Content-Type:
text/plain -
Body:
Wallet balance: <balance>Where
<balance>is the total balance of the wallet in Dogecoin.
Example
curl http://localhost:<port>/getBalance
Sample Response
Wallet balance: 123.45678900
GET /getAddresses
Retrieves all addresses associated with the wallet.
Request
- Method:
GET - URL:
/getAddresses
Response
-
Content-Type:
text/plain -
Body:
address: <address1>
address: <address2>
...
Each line contains an address associated with the wallet.
Example
curl http://localhost:<port>/getAddresses
Sample Response
address: DH5yaieqoZN36fDVciNyRueRGvGLR3mr7L
address: DQe1QeG4FxhEgvfuvGfC7oL5G2G87huuxU
GET /getTransactions
Retrieves all spent (non-spendable) transactions associated with the wallet.
Request
- Method:
GET - URL:
/getTransactions
Response
-
Content-Type:
text/plain -
Body:
----------------------
txid:           <txid>
vout:           <vout>
address:        <address>
script_pubkey:  <script_pubkey>
amount:         <amount>
confirmations:  <confirmations>
spendable:      <spendable>
solvable:       <solvable>
...
Spent Balance: <total_spent_balance>
Information about each spent transaction (UTXO) and the total spent balance.
Example
curl http://localhost:<port>/getTransactions
Sample Response
----------------------
txid:           e3b0c44298fc1c149afbf4c8996fb92427ae41e4649b934ca495991b7852b855
vout:           0
address:        DH5yaieqoZN36fDVciNyRueRGvGLR3mr7L
script_pubkey:  76a9144621d6a7f3b4ebbaee4e2d8c10eafbf1ccbc9c0a88ac
amount:         50.00000000
confirmations:  100
spendable:      0
solvable:       1
Spent Balance: 50.00000000
GET /getUTXOs
Retrieves all unspent transaction outputs (UTXOs) associated with the wallet.
Request
- Method:
GET - URL:
/getUTXOs
Response
-
Content-Type:
text/plain -
Body:
----------------------
Unspent UTXO:
txid:           <txid>
vout:           <vout>
address:        <address>
script_pubkey:  <script_pubkey>
amount:         <amount>
confirmations:  <confirmations>
spendable:      <spendable>
solvable:       <solvable>
...
Total Unspent: <total_unspent_balance>
Information about each unspent transaction output and the total unspent balance.
Example
curl http://localhost:<port>/getUTXOs
Sample Response
----------------------
Unspent UTXO:
txid:           b1fea5241c4a1d7d1e6c6d619fbf3bb8b1ec3f1f1d2f4c5b6a7c8d9e0f1a2b3c
vout:           1
address:        DQe1QeG4FxhEgvfuvGfC7oL5G2G87huuxU
script_pubkey:  76a9145d6a7f3b4ebbaee4e2d8c10eafbf1ccbc9c0a88ac
amount:         75.00000000
confirmations:  100
spendable:      1
solvable:       1
Total Unspent: 75.00000000
GET /getWallet
Downloads the wallet file associated with the node.
Request
- Method:
GET - URL:
/getWallet
Response
-
Content-Type:
application/octet-stream -
Body:
Binary data of the wallet file.
Example
curl -O http://localhost:<port>/getWallet
Notes
- The response is a binary file.
- Ensure that it's secure as it contains sensitive information.
GET /getHeaders
Downloads the headers file used by the SPV node.
Request
- Method:
GET - URL:
/getHeaders
Response
-
Content-Type:
application/octet-stream -
Body:
Binary data of the headers file.
Example
curl -O http://localhost:<port>/getHeaders
Notes
- The response is a binary file containing blockchain headers.
- Useful for debugging or analysis purposes.
GET /getChaintip
Retrieves the current chain tip (the latest block height known to the node).
Request
- Method:
GET - URL:
/getChaintip
Response
-
Content-Type:
text/plain -
Body:
Chain tip: <block_height>Where
<block_height>is the height of the latest block known to the SPV node.
Example
curl http://localhost:<port>/getChaintip
Sample Response
Chain tip: 3500000
GET /getTimestamp
Retrieves the current timestamp of the SPV node.
Request
- Method:
GET - URL:
/getTimestamp
Response
-
Content-Type:
text/plain -
Body:
Timestamp: <timestamp>Where
<timestamp>is the current date and local time of the SPV node.
Example
curl http://localhost:<port>/getTimestamp
Sample Response
2024-10-26 15:30:00
GET /getLastBlockInfo
Retrieves information about the last block processed by the SPV node.
Request
-
Method:
GET -
URL:
/getLastBlockInfo
Response
-
Content-Type:
text/plain -
Body:
Block size: <last_block_size>
Tx count: <last_block_tx_count>
Total tx size: <last_block_total_tx_size>
Where:
<last_block_size>is the size of the last block in bytes.<last_block_tx_count>is the number of transactions in the last block.<last_block_total_tx_size>is the total size of transactions in the last block.
Example
curl http://localhost:<port>/getLastBlockInfo
Sample Response
Block size: 4130
Tx count: 11
Total tx size: 3355
Additional Information
- Server Address: Replace
<port>in the examples with the port number where your Libdogecoin SPV node is running. - Content Types:
- Endpoints returning plain text data use
Content-Type: text/plain. - Endpoints returning binary data use
Content-Type: application/octet-stream.
- Endpoints returning plain text data use
- Security Considerations:
- Sensitive endpoints like
/getWalletexpose critical data. - Always safeguard your wallet file to prevent unauthorized access to your funds.
- Sensitive endpoints like
Usage Notes
-
cURL: The examples use
curlfor simplicity. You can use any HTTP node to interact with the API. -
Error Handling: If an endpoint encounters an error, it will respond with an appropriate HTTP status code and message.
-
For example, if the wallet file is not found:
HTTP/1.1 404 Not Found
Content-Type: text/plain

Wallet file not found
-
-
Concurrency: The SPV node should handle multiple concurrent requests gracefully. However, ensure that shared resources like the wallet and UTXO set are managed in a thread-safe manner.
Libdogecoin Signing API
Table of Contents
Abstract
This document describes the process of message signing within libdogecoin. It aims to meet the standards defined in BIP-137 although the implementation is only applicable to P2PKH addresses.
Basic Signing API
sign_message:
char* sign_message(char* privkey, char* msg) {
    if (!privkey || !msg) return false;

    uint256_t message_bytes;
    hash_message(msg, message_bytes);

    size_t compact_signature_length = 65;
    unsigned char* compact_signature = dogecoin_uchar_vla(compact_signature_length);

    dogecoin_key key;
    dogecoin_pubkey pubkey;
    if (!init_keypair(privkey, &key, &pubkey)) return false;

    int recid = -1;

    if (!dogecoin_key_sign_hash_compact_recoverable_fcomp(&key, message_bytes, compact_signature, &compact_signature_length, &recid)) return false;
    if (!dogecoin_key_recover_pubkey((const unsigned char*)compact_signature, message_bytes, recid, &pubkey)) return false;

    char p2pkh_address[P2PKHLEN];
    if (!dogecoin_pubkey_getaddr_p2pkh(&pubkey, &dogecoin_chainparams_main, p2pkh_address)) return false;

    unsigned char* base64_encoded_output = dogecoin_uchar_vla(1+(sizeof(char)*base64_encoded_size(compact_signature_length)));
    base64_encode((unsigned char*)compact_signature, compact_signature_length, base64_encoded_output);

    dogecoin_free(compact_signature);
    dogecoin_privkey_cleanse(&key);
    dogecoin_pubkey_cleanse(&pubkey);

    return (char*)base64_encoded_output;
}
This function signs a message with a private key.
C usage:
char* sig = sign_message("QUtnMFjt3JFk1NfeMe6Dj5u4p25DHZA54FsvEFAiQxcNP4bZkPu2", "This is just a test message");
verify_message:
int verify_message(char* sig, char* msg, char* address) {
    if (!(sig || msg || address)) return false;

    uint256_t message_bytes;
    hash_message(msg, message_bytes);

    size_t encoded_length = strlen((const char*)sig);
    unsigned char* decoded_signature = dogecoin_uchar_vla(base64_decoded_size(encoded_length+1)+1);
    base64_decode((unsigned char*)sig, encoded_length, decoded_signature);

    dogecoin_pubkey pub_key;
    dogecoin_pubkey_init(&pub_key);
    pub_key.compressed = false;

    int header = decoded_signature[0] & 0xFF;

    if (header < 27 || header > 42) return false;

    if (header >= 31) {
        pub_key.compressed = true;
        header -= 4;
    }

    int recid = header - 27;
    if (!dogecoin_key_recover_pubkey((const unsigned char*)decoded_signature, message_bytes, recid, &pub_key)) return false;
    if (!dogecoin_pubkey_verify_sigcmp(&pub_key, message_bytes, decoded_signature)) return false;

    char p2pkh_address[P2PKHLEN];
    const dogecoin_chainparams* chain = chain_from_b58_prefix(address);
    if (!dogecoin_pubkey_getaddr_p2pkh(&pub_key, chain, p2pkh_address)) return false;

    dogecoin_free(decoded_signature);
    dogecoin_pubkey_cleanse(&pub_key);
    return strcmp(p2pkh_address, address)==0;
}
This function verifies a signed message using a P2PKH address.
C usage:
char* address = "DA8aeVkgQWwo78y3VCXtLqoWe8uWRoFuc1";
int ret = verify_message(sig, msg, address);
if (!ret) {
  return false;
}
Using Libdogecoin Tools
Overview
If you are looking to just explore the functionality of Libdogecoin without building a complicated project yourself, look no further than the CLI tools provided in this repo. The first tool, such, is an interactive CLI application that allows you to perform all Essential address and transaction operations with prompts to guide you through the process. The second tool, sendtx, handles the process of broadcasting a transaction built using Libdogecoin to eventually push it onto the blockchain. The third tool, spvnode, run a Simple Payment Verification (SPV) node for the Dogecoin blockchain. It enables users to interact with the Dogecoin network, verify transactions and stay in sync with the blockchain.
This document goes over the usage of these tools along with examples of how to use them.
The such Tool
As stated above, the such tool can be used to perform all Libdogecoin address and transaction functions, and even more. It can generate different types of public and private keys, derive and convert keys, and fully build and sign transactions.
Usage
The such tool can be used by simply running the command ./such in the top level of the Libdogecoin directory, always followed by a -c flag that denotes the desired such command to run. The options for this command are below:
- generate_private_key
- generate_public_key
- p2pkh
- bip32_extended_master_key
- derive_child_keys
- generate_mnemonic
- list_encryption_keys_in_tpm
- decrypt_master_key
- decrypt_mnemonic
- seed_to_master_key
- mnemonic_to_key
- mnemonic_to_addresses
- print_keys
- sign
- comp2der
- bip32maintotest
- signmessage
- verify_message
- transaction
So an example run of such could be something like this:
./such -c generate_private_key
Most of these commands require a flag following them to denote things like existing keys, transaction hex strings, and more:
| Flag | Name | Required Arg? | Usage |
|---|---|---|---|
| -p, --privkey | private_key | yes | generate_public_key -p <private_key> |
| -k, --pubkey | public_key | yes | p2pkh -k <public_key> |
| -m, --derived_path | derived_path | yes | derive_child_key -p <extended_private_key> -m <derived_path> |
| -e, --entropy | hex_entropy | yes | generate_mnemonic -e <hex_entropy> |
| -n, --mnemonic | seed_phrase | yes | mnemonic_to_key or mnemonic_to_addresses -n <seed_phrase> |
| -a, --pass_phrase | pass_phrase | no | mnemonic_to_key or mnemonic_to_addresses -n <seed_phrase> -a |
| -o, --account_int | account_int | yes | mnemonic_to_key or mnemonic_to_addresses -n <seed_phrase> -o <account_int> |
| -g, --change_level | change_level | yes | mnemonic_to_key or mnemonic_to_addresses -n <seed_phrase> -g <change_level> |
| -i, --address_index | address_index | yes | mnemonic_to_key or mnemonic_to_addresses -n <seed_phrase> -i <address_index> |
| -y, --encrypted_file | file_num | yes | generate_mnemonic, bip32_extended_master_key, decrypt_master_key, decrypt_mnemonic, seed_to_master_key, mnemonic_to_key or mnemonic_to_addresses -y <file_num> |
| -w, --overwrite | overwrite | no | generate_mnemonic or bip32_extended_master_key -w |
| -b, --silent | silent | no | generate_mnemonic or bip32_extended_master_key -b |
| -j, --use_tpm | use_tpm | no | generate_mnemonic, bip32_extended_master_key, decrypt_master_key, decrypt_mnemonic, seed_to_master_key, mnemonic_to_key or mnemonic_to_addresses -j |
| -t, --testnet | designate_testnet | no | generate_private_key -t |
| -s | script_hex | yes | comp2der -s <compact_signature> |
| -x | transaction_hex | yes | sign -x <transaction_hex> -s <pubkey_script> -i <index_of_utxo_to_sign> -h <sig_hash_type> |
| -i | input_index | yes | see above |
| -h | sighash_type | yes | see above |
Below is a list of all the commands and the flags that they require. As a reminder, any command that includes the -t flag will set the default chain used in internal calculations to testnet rather than mainnet. Also included are descriptions of what each function does.
| Command | Required flags | Optional flags | Description |
|---|---|---|---|
| generate_private_key | None | -t | Generates a private key from a secp256k1 context for either mainnet or testnet. |
| generate_public_key | -p | -t | Generates a public key derived from the private key specified. Include the testnet flag if it was generated from testnet. |
| p2pkh | -k | -t | Generates a p2pkh address derived from the public key specified. Include the testnet flag if it was generated from testnet. |
| bip32_extended_master_key | None | -t | Generate an extended master private key from a secp256k1 context for either mainnet or testnet. |
| bip32maintotest | -p | None | Convert a mainnet private key into an equivalent testnet key. |
| derive_child_keys | -p, -m | -t | Generates a child key derived from the specified public or private key using the specified derivation path. |
| generate_mnemonic | None | -e, -y, -w, -b | Generates a 24-word english seed phrase randomly or from optional hex entropy. |
| list_encryption_keys_in_tpm | None | None | List the encryption keys in the TPM. |
| decrypt_master_key | -y | -j | Decrypt the master key with the TPM or SW. |
| decrypt_mnemonic | -y | -j | Decrypt the mnemonic with the TPM or SW. |
| seed_to_master_key | -y | -j, -t | Generates an extended master private key from a seed for either mainnet or testnet. |
| mnemonic_to_key | -n | -a, -y, -o, g, -i, -t | Generates a private key from a seed phrase with a default path or specified account, change level and index for either mainnet or testnet. |
| mnemonic_to_addresses | -n | -a, -y, -o, g, -i, -t | Generates an address from a seed phrase with a default path or specified account, change level and index for either mainnet or testnet. |
| print_keys | -p | -t | Print all keys associated with the provided private key. |
| sign | -x, -s, -i, -h, -p | -t | See the definition of sign_raw_transaction in the Transaction API. |
| comp2der | -s | None | Convert a compact signature to a DER signature. |
| signmessage | -x, -p | None | Sign a message and output a base64 encoded signature and address. |
| verify_message | -x, -s, -k | None | Verify a message by public key recovery of base64 decoded signature and comparison of addresses. |
| transaction | None | None | Start the interactive transaction app. Usage instructions below. |
Lastly, to display the version of such, simply run the following command, which overrides any previous ones specified:
./such -v
Examples
Below are some examples on how to use the such tool in practice.
Generate a new private key WIF and hex encoded:
./such -c generate_private_key
> privatekey WIF: QSPDnjzvrSPAeiM7N2jCkzv2dqsi7fxoHipgpPfz2zdE3ZpYp74j
> privatekey HEX: 7073fa30281cf89195dca333134368d539e7abad712abb532c9eaf5f3666d9d1
Generate the public key, p2pkh, and p2sh-p2pkh address from a WIF encoded private key
./such -c generate_public_key -p QSPDnjzvrSPAeiM7N2jCkzv2dqsi7fxoHipgpPfz2zdE3ZpYp74j
> pubkey: 02cf2c99c2db4b3d72d4289aa23bdaf5f3ccf4867ec8e5f8223ea716a7a3de10bc
> p2pkh address: D62RKK6AGkzX6fM8RzoVM8fjPx2nzrdvKU
Generate the P2PKH address from a hex encoded compact public key
./such -c generate_public_key -pubkey 02cf2c99c2db4b3d72d4289aa23bdaf5f3ccf4867ec8e5f8223ea716a7a3de10bc
> p2pkh address: D62RKK6AGkzX6fM8RzoVM8fjPx2nzrdvKU
Generate new BIP32 master key
./such -c bip32_extended_master_key
> masterkey: dgpv51eADS3spNJh9qLpW8S7B7uZmusTpNE85NgXsYD7eGuVhebMDfEsj6fNR6DHgpSBCmYdAvw9YRSqRWnFxtYn1bM8AdNipwdi9dDXFCY8vkY
Print HD node
./such -c print_keys -privkey dgpv51eADS3spNJh9qLpW8S7B7uZmusTpNE85NgXsYD7eGuVhebMDfEsj6fNR6DHgpSBCmYdAvw9YRSqRWnFxtYn1bM8AdNipwdi9dDXFCY8vkY
> ext key:             dgpv51eADS3spNJh9qLpW8S7B7uZmusTpNE85NgXsYD7eGuVhebMDfEsj6fNR6DHgpSBCmYdAvw9YRSqRWnFxtYn1bM8AdNipwdi9dDXFCY8vkY
> extended pubkey:     dgub8kXBZ7ymNWy2SgzyYN45HyTAEUF6eVFqMyTk2ec6SPxWFhi3dRneNQ51zJadLERvA1ns9uvMGKM9wYKTSnCP9QrSPJMCKjdfSv4qmT3PkP2
> pubkey hex:          025368ca428b4c4e0c48631c5f8510d704858a52c7264d4ba74f34b2bcee374220
> privatekey WIF:      QTtXPXYWc4G6WuA6qNRYeQ3TAdsBUUqrLwN1eWVFEvfHdd8M1ed5
> depth:               0
> child index:         0
> p2pkh address:       D79Q3spkucaM2DvLxUZjgV1X4cQcWDLuyt
Derive child key (second child key at level 1 in this case)
./such -c derive_child_keys -m m/1h -privkey dgpv51eADS3spNJh9qLpW8S7B7uZmusTpNE85NgXsYD7eGuVhebMDfEsj6fNR6DHgpSBCmYdAvw9YRSqRWnFxtYn1bM8AdNipwdi9dDXFCY8vkY
> ext key:             dgpv53gfwGVYiKVgf3hybqGjXuxrW2s2iCArhBURxAWaFszfqfP6wc23KFVyCuGj4fGzAX6oC8QmvhvkWz18v4VcdhzYCxoTR3XQizrVtjMwQHS
> extended pubkey:     dgub8nZhGxRSGUA1wuN8e4themWSxbEfYKCZynFe7GuZ413gPiVoMNZoxYucn8DQ5doeqt1cmZnxZ4Ms9SdsraiSbUkZSYbx1GzpGbrAqmFdSSL
> pubkey hex:          023973b755fdaf5b2b7b20ac134c936ec7882b1ce0a3a75857fc490c12cdf4fb4f
> privatekey WIF:      QQUwLsFpWWXsHFLCxjvBMn8Qd4Pgqji5QUXz6zN8vkiKMPvv7mpZ
> depth:               1
> child index:         -2147483647
> p2pkh address:       DFqonEEA56VE8zEGvhXNgjiPT3PaPFNQQu
Derive public child key (second child key at level 2 in this case, non-hardened)
./such -c derive_child_keys -m m/1 -p dgub8sdBNNzYwKo1KKQcQoJXMDwEg3fgX52aY2aSuSGMXepn71kMtZoN7BVwWp7JT582EDT8djTpCMx7Nd62nJ8u8xNmszEXrmsHWf6XQccjiLg
> ext key:             dgub8q9VuPpS4NijK4e7Cc7WaKGD6QHjUB3YkJi83imYVvBRGjrKwPcNFjNcmNt2UnEuhFmKhcmo8aRQABUhq55H3ackUBGj3nJDTMpcP6ALoiN
> extended pubkey:     dgub8q9VuPpS4NijK4e7Cc7WaKGD6QHjUB3YkJi83imYVvBRGjrKwPcNFjNcmNt2UnEuhFmKhcmo8aRQABUhq55H3ackUBGj3nJDTMpcP6ALoiN
> pubkey hex:          02cbfea5f5cf7d28b9111e92f05356a39a64f19247e539b428ef91e70a6900ae71
> depth:               2
> child index:         1
> p2pkh address:       D7M52mS3ZTrPXgRmfjpV5pPSG2E2TsfZAi
Generate a random BIP39 seed phrase
See "Seed phrases" in address.md, for additional guidance
./such -c generate_mnemonic
> they nuclear observe moral twenty gym hedgehog damage reveal syrup negative beach best silk alone feel vapor deposit belt host purity run clever deer
Generate a HD master key from the seed phrase for a given account (2), change level (1, internal) and index (0) for testnet
./such -c mnemonic_to_key -n "they nuclear observe moral twenty gym hedgehog damage reveal syrup negative beach best silk alone feel vapor deposit belt host purity run clever deer" -o 2 -g 1 -i 0 -t
> keypath: m/44'/1'/2'/1/0
> private key (wif): cniAjMkD7HpzQKw67ByNsyzqMF8MEJo2y4viH2WEZRXoKHNih1sH
Generate an HD address from the seed phrase for a given account (2), change level (1, internal) and index (0) for testnet
./such -c mnemonic_to_addresses -n "they nuclear observe moral twenty gym hedgehog damage reveal syrup negative beach best silk alone feel vapor deposit belt host purity run clever deer" -o 2 -g 1 -i 0 -t
> Address: nW7ndt4HZh8XwLYN6v6N2S4mZCbpZPuFxh
Generate a BIP39 seed phrase from hex entropy
./such -c generate_mnemonic -e "FFFFFFFFFFFFFFFFFFFFFFFFFFFFFFFFFFFFFFFFFFFFFFFFFFFFFFFFFFFFFFFF"
> zoo zoo zoo zoo zoo zoo zoo zoo zoo zoo zoo zoo zoo zoo zoo zoo zoo zoo zoo zoo zoo zoo zoo vote
Geneate an HD address from the seed phrase and default path (m/44'/3'/0'/0/0) for mainnet
./such -c mnemonic_to_addresses -n "zoo zoo zoo zoo zoo zoo zoo zoo zoo zoo zoo zoo zoo zoo zoo zoo zoo zoo zoo zoo zoo zoo zoo vote"
> Address: DTdKu8YgcxoXyjFCDtCeKimaZzsK27rcwT
Sign an arbitrary message
./such -c signmessage -x bleh -p QWCcckTzUBiY1g3GFixihAscwHAKXeXY76v7Gcxhp3HUEAcBv33i
message: bleh
content: ICrbftD0KamyaB68IoXbeke3w4CpcIvv+Q4pncBNpMk8fF5+xsR9H9gqmfM0JrjlfzZZA3E8AJ0Nug1KWeoVw3g=
address: D8mQ2sKYpLbFCQLhGeHCPBmkLJRi6kRoSg
Verify an arbitrary message
./such -c verifymessage -x bleh -s ICrbftD0KamyaB68IoXbeke3w4CpcIvv+Q4pncBNpMk8fF5+xsR9H9gqmfM0JrjlfzZZA3E8AJ0Nug1KWeoVw3g= -k D8mQ2sKYpLbFCQLhGeHCPBmkLJRi6kRoSg
Message is verified!
Encrypted Mnemonics, Key and Seed Backups
The such tool provides functionality to securely manage your encrypted mnemonics, key and seed backups. With the ability to generate mnemonics and encrypt them for safe storage, and to decrypt them when needed, managing your cryptographic assets is made easier. To use encrypted files with spvnode, you must first use the such tool to generate and encrypt your mnemonic or master key. You can then use the spvnode tool to import the encrypted file and use it to connect to the network.
Generating and Encrypting Mnemonics
To generate a new mnemonic, which is a 24-word seed phrase, you can use the following command:
./such -c generate_mnemonic
This will output a new mnemonic that you can use to generate keys and addresses. If you want to encrypt this mnemonic to keep it safe, you can use the following command:
./such -c generate_mnemonic -y <file_num>
The -y flag is used to specify the file number to use for encryption. This number is used to identify the encrypted file when you need to decrypt it. You can also use the -w flag to overwrite an existing file with the same number. If you want to encrypt the mnemonic using a TPM (Trusted Platform Module), you can use the -j flag as shown:
./such -c generate_mnemonic -y <file_num> -j
Replace <file_num> with the appropriate file number you want to use for encryption (e.g. 0, 1, 2, etc.). 999 is reserved for testing purposes.
Encrypting a mnemonic will output a file with the encrypted mnemonic. You can use the -b flag to suppress the mnemonic output and only output the encrypted file. This is useful if you want to encrypt a mnemonic and save it to a file without displaying the mnemonic on the screen. For example:
./such -c generate_mnemonic -y <file_num> -b
All encryted files are saved in the store directory. On Linux, this is .store in the libdogecoin directory. On Windows, this is the store directory in the libdogecoin directory.
Decrypting Mnemonics
When you need to access your encrypted mnemonic, you can decrypt it using the decrypt_mnemonic command. If the mnemonic was encrypted using TPM (Trusted Platform Module), you can use the -j flag as shown:
./such -c decrypt_mnemonic -y <file_num> -j
Replace <file_num> with the appropriate file number you used during encryption.
Handling Key Backups
You can also encrypt and decrypt your master key using similar commands. To encrypt a master key, you might first generate it and then encrypt as follows:
./such -c bip32_extended_master_key -y <file_num> -j
And to decrypt it back when required:
./such -c decrypt_master_key -y <file_num> -j
Always ensure to replace <file_num> with the actual number of the encrypted file.
Handling Seed Backups
You can also decrypt your seed backups using the seed_to_master_key command. This command will decrypt the seed and generate a master key from it. If the seed was encrypted using TPM (Trusted Platform Module), you can use the -j flag as shown:
./such -c seed_to_master_key -y <file_num> -j
Overwriting Encrypted Files
If you want to overwrite an existing encrypted file, you can use the -w flag as shown:
./such -c generate_mnemonic -y <file_num> -w
This will overwrite the existing file with the same number. You can also use the -w flag with the bip32_extended_master_key command to overwrite an existing encrypted master key.
Best Practices
- Backup: Always backup your encrypted files in multiple secure locations. Adhering to the "rule of three" is advised, meaning you should have three copies of your data: the original, a primary backup, and a secondary backup, ideally kept in different locations to mitigate the risk of data loss due to environmental factors.
- File Numbers: Encrypting files with the same file number will overwrite the previous file with the same number of that type. This is useful for overwriting old backups with new ones, but can be dangerous if you accidentally overwrite a file you need. Always keep track of your file numbers and what they are used for.
- Security: Use a TPM where available for added security during encryption and decryption processes. Encryption keys are stored in the TPM and never leave the TPM. The TPM is a hardware device that is designed to be tamper resistant. If you do not have a TPM, you can use software encryption and decryption, but this is less secure than using a TPM.
- Overwrites: Overwriting encrypted files is irreversible. Files and backups encrypted with TPM cannot be decrypted once overwritten. Files and backups encrypted with software can be decrypted with software, but the original file will be lost.
Important Notes (General)
-
If you lose your encrypted files, you will not be able to decrypt your mnemonics or master keys.
-
If you lose your mnemonic or master key, you will not be able to recover your coins.
-
Overwriting encrypted files is irreversible.
Important Notes (TPM-specific)
-
If you lose your TPM, you will not be able to decrypt your mnemonics or master keys.
-
TPM encrypted files cannot be decrypted with software.
These commands and flags are part of the such CLI tool's functionality, enabling a robust management system for your encrypted data within the Libdogecoin ecosystem.
Interactive Transaction Building with such
When you start the interactive such transaction tool with ./such -c transaction, you will be faced with a menu of options. To choose one of these options to execute, simply type the number of that command and hit enter.
| Command | Description |
|---|---|
| add transaction | Start building a new transaction. |
| edit transaction by id | Make changes to a transaction that has already been started. |
| find transaction | Print out the hex of a transaction that has already been started. |
| sign transaction | Sign the inputs of a finalized transaction. |
| delete transaction | Remove an existing transaction from memory. |
| delete all transactions | Remove all existing transactions from memory. |
| print transactions | Start building a new transaction. |
| import raw transaction | Saves the entered transaction hex as a transaction object in memory. |
| broadcast transaction | Performs the same operation as [./sendtx] (#the-sendtx-tool) (sendtx recommended) |
| change network | Specify the network for building transactions. |
| quit | Exit the tool. |
Once you choose a command, there will be on-screen prompts to guide your next actions. All of these commands internally call the functions that make up Libdogecoin, so for more information on what happens when these commands are run, please refer to the Libdogecoin Essential Transaction API.
The sendtx Tool
Now that you've built a sendable transaction with Libdogecoin, sendtx is here to broadcast that transaction so that it can be published on the blockchain. You can broadcast to peers retrieved from a DNS seed or specify with IP/port. The application will try to connect to a default maximum of 10 peers, send the transaction to two of them, and listen on the remaining ones if the transaction has been relayed back. Alongside Libdogecoin, sendtx gives you the capability to publish your own transactions directly to the blockchain without using external services.
Usage
Similar to such, sendtx is simple to run and is invoked by simply running the command ./sendtx in the top level of the Libdogecoin directory, which is then simply followed by the transaction hex to broadcast rather than a command like in such. There are still several flags that may be helpful
| Flag | Name | Required Arg? | Usage |
|---|---|---|---|
| -t, --testnet | designate_testnet | no | ./sendtx -t <tx_hex_for_testnet> |
| -r, --regtest | designate_regtest | no | ./sendtx -r <tx_hex_for_regtest> |
| -d, --debug | designate_debug | no | ./sendtx -d <tx_hex> |
| -s, --timeout | timeout_threshold | yes | ./sendtx -s 10 <tx_hex> |
| -i, --ips | ip_addresses | yes | ./sendtx -i 127.0.0.1:22556,192.168.0.1:22556 <tx_hex> |
| -m, --maxnodes | max_connected_nodes | yes | ./sendtx -m 6 <tx_hex> |
Lastly, to display only the version of sendtx, simply run the following command:
./sendtx -v
Examples
Below are some examples on how to use the sendtx tool in practice.
Send a raw transaction to random peers on mainnet
./sendtx <tx_hex>
Send a raw transaction to random peers on testnet and show debug information
./sendtx -d -t <tx_hex>
Send a raw transaction to specific peers on mainnet and show debug information using a timeout of 5s
./sendtx -d -s 5 -i 192.168.1.110:22556,127.0.0.1:22556 <tx_hex>
Send a raw transaction to at most 5 random peers on mainnet
./sendtx -m 5 <tx_hex>
The spvnode Tool
spvnode is a command-line tool that operates a Simple Payment Verification (SPV) node for the Dogecoin blockchain. It enables users to interact with the Dogecoin network, verify transactions, and stay in sync with the blockchain.
Operation Modes
spvnode supports two operational modes:
-
Header-Only Mode: This mode is for quickly catching up with the blockchain by downloading only the block headers. This mode is typically used for initial sync, and then the node can switch to full block mode for verifying transactions.
-
Full Block Mode: After catching up with the blockchain headers,
spvnodecan switch to this mode to download full blocks for detailed transaction history scanning. This is essential for verifying transactions related to the user's wallet addresses.
Usage
To use spvnode, execute it from the top level of the Libdogecoin directory. Start the tool by running ./spvnode followed by the scan command. There are several flags that can be used to customize the behavior of spvnode:
Each flag is accompanied by a description and usage example. To view the version of spvnode, simply run:
./spvnode -v
Run spvnode in header-only mode for a fast catch-up:
./spvnode scan
To activate full block validation mode for comprehensive address scanning, include the -b flag:
./spvnode -b scan
To utilize checkpoints for faster initial sync, apply the -p flag:
./spvnode -p scan
| Flag | Name | Required Arg? | Usage |
|---|---|---|---|
-t, --testnet | Testnet Mode | No | Activate testnet: ./spvnode -t scan |
-r, --regtest | Regtest Mode | No | Activate regtest network: ./spvnode -r scan |
-i, --ips | Initial Peers | Yes | Specify initial peers: ./spvnode -i 127.0.0.1:22556 scan |
-d, --debug | Debug Mode | No | Enable debug output: ./spvnode -d scan |
-m, --maxnodes | Max Peers | No | Set max peers: ./spvnode -m 8 scan |
-a, --address | Address | Yes | Use address: ./spvnode -a "your address here" scan |
-n, --mnemonic | Mnemonic Seed | Yes | Use BIP39 mnemonic: ./spvnode -n "your mnemonic here" scan |
-s, --pass_phrase | Passphrase | No | Passphrase for BIP39 seed: ./spvnode -s scan |
-f, --dbfile | Database File | No | Headers DB file/mem-only (0): ./spvnode -f 0 scan |
-c, --continuous | Continuous Mode | No | Run continuously: ./spvnode -c scan |
-b, --full_sync | Full Sync | No | Perform a full sync: ./spvnode -b scan |
-p, --checkpoint | Checkpoint | No | Enable checkpoint sync: ./spvnode -p scan |
-w, --wallet_file | Wallet File | Yes | Specify wallet file: ./spvnode -w "./wallet.db" scan |
-h, --headers_file | Headers File | Yes | Specify headers DB file: ./spvnode -h "./headers.db" scan |
-l, --no_prompt | No Prompt | No | Load wallet and headers without prompt: ./spvnode -l scan |
-y, --encrypted_file | Encrypted File | Yes | Use encrypted file: ./spvnode -y 0 scan |
-j, --use_tpm | Use TPM | No | Utilize TPM for decryption: ./spvnode -j scan |
-k, --master_key | Master Key | No | Use master key decryption: ./spvnode -k scan |
-z, --daemon | Daemon Mode | No | Run as a daemon: ./spvnode -z scan |
Commands
The primary command for spvnode is scan, which syncs the blockchain headers:
scan
Connects to the Dogecoin network and synchronizes the blockchain headers to the local database.
Callback Functions
The tool provides several callbacks for custom integration:
spv_header_message_processed: Triggered when a header is processed.spv_sync_completed: Invoked upon completion of the sync process.
Best Practices and Notes
When not specifying -w, spvnode will default to using main_wallet.db. To prevent unintended interactions with main_wallet.db, it's important to be consistent with the use of flags. The best practice is to always use -w and specify a distinct wallet file, especially when using new mnemonics or keys.
When using -n with a mnemonic, instead of main_wallet.db, spvnode will generate main_mnemonic_wallet.db.
Examples
Sync up to the chain tip and stores all headers in headers.db (quit once synced):
./spvnode scan
Sync up to the chain tip and give some debug output during that process:
./spvnode -d scan
Sync up, show debug info, don't store headers in file (only in memory), wait for new blocks:
./spvnode -d -f 0 -c -b scan
Sync up, with an address, show debug info, don't store headers in file, wait for new blocks:
./spvnode -d -f 0 -c -a "DSVw8wkkTXccdq78etZ3UwELrmpfvAiVt1" -b scan
Sync up, with a wallet file "main_wallet.db", show debug info, don't store headers in file, wait for new blocks:
./spvnode -d -f 0 -c -w "./main_wallet.db" -b scan
Sync up, with a wallet file "main_wallet.db", show debug info, with a headers file "main_headers.db", wait for new blocks:
./spvnode -d -c -w "./main_wallet.db" -h "./main_headers.db" -b scan
Sync up, with a wallet file "main_wallet.db", with an address, show debug info, with a headers file, with a headers file "main_headers.db", wait for new blocks:
./spvnode -d -c -a "DSVw8wkkTXccdq78etZ3UwELrmpfvAiVt1" -w "./main_wallet.db" -h "./main_headers.db" -b scan
Sync up, with encrypted mnemonic 0, show debug info, don't store headers in file, wait for new blocks:
./spvnode -d -f 0 -c -y 0 -b scan
Sync up, with encrypted mnemonic 0, BIP39 passphrase, show debug info, don't store headers in file, wait for new blocks:
./spvnode -d -f 0 -c -y 0 -s -b scan
Sync up, with encrypted mnemonic 0, BIP39 passphrase, show debug info, don't store headers in file, wait for new blocks, use TPM:
./spvnode -d -f 0 -c -y 0 -s -j -b scan
Sync up, with encrypted key 0, show debug info, don't store headers in file, wait for new blocks, use master key:
./spvnode -d -f 0 -c -y 0 -k -b scan
Sync up, with encrypted key 0, show debug info, don't store headers in file, wait for new blocks, use master key, use TPM:
./spvnode -d -f 0 -c -y 0 -k -j -b scan
Sync up, with mnemonic "test", BIP39 passphrase, show debug info, don't store headers in file, wait for new blocks:
./spvnode -d -f 0 -c -n "test" -s -b scan
Sync up, with a wallet file "main_wallet.db", with encrypted mnemonic 0, show debug info, don't store headers in file, wait for new blocks:
./spvnode -d -f 0 -c -w "./main_wallet.db" -y 0 -b scan
Sync up, with a wallet file "main_wallet.db", with encrypted mnemonic 0, show debug info, with a headers file "main_headers.db", wait for new blocks:
./spvnode -d -c -w "./main_wallet.db" -h "./main_headers.db" -y 0 -b scan
Sync up, with a wallet file "main_wallet.db", with encrypted mnemonic 0, show debug info, with a headers file "main_headers.db", wait for new blocks, use TPM:
./spvnode -d -c -w "./main_wallet.db" -h "./main_headers.db" -y 0 -j -b scan
Libdogecoin Transaction API
Table of Contents
- Libdogecoin Transaction API
- Table of Contents
- Introduction
- Working Transaction API
- Essential Transaction API
- start_transaction
- add_utxo
- add_output
- finalize_transaction
- finalize_transaction_ex
- get_raw_transaction
- get_raw_transaction_ex
- clear_transaction
- sign_raw_transaction
- sign_raw_transaction_ex
- sign_transaction
- store_raw_transaction
- sign_indexed_raw_transaction_ex
- sign_transaction_ex
- sign_transaction_w_privkey_ex
Introduction
The high level 'essential' API provided by libdogecoin for working with simple transactions revolve around a structure defined as a working_transaction which is comprised of an index as an integer meant for retrieval, a dogecoin_tx 'transaction' structure as seen above, and finally a UT_hash_handle which stores our working_transaction struct in a hash table (using Troy D. Hanson's uthash library: see ./include/dogecoin/uthash.h and visit https://troydhanson.github.io/uthash/ for more information) which allow us to generate multiple transactions per "session". This working_transaction structure is defined as such:
typedef struct working_transaction {
    int index;
    dogecoin_tx* transaction;
    UT_hash_handle hh;
} working_transaction;
The functions that have been built around this working_transaction structure and flow of operation are comprised of 4 macros, which are explained further in the following section describing the working transaction API. used to interact with uthash. For more detailed technical information about the dogecoin_tx structure and Dogecoin transactions in general, please refer to the extended transaction documentation.
The api itself is a higher level interface that contains all the necessary operations for building Dogecoin transactions from scratch. The generic process for building a transaction is as follows:
- Create an empty transaction.
- Add inputs from your wallet's UTXOs.
- Add outputs describing amount and recipient.
- Return any leftover change back to your address.
- Sign all inputs with your wallet's private key.
All of these steps can be done purely with Libdogecoin API, by calling directly from C and including the "libdogecoin.h" header file. For details on the usage of this API, jump to the Essential API section.
Working Transaction API
These functions are designed to be "under the hood" and obfuscated from the end user as you will see in the Essential functions later on. They are to be used for manipulating the hash table which stores transactions in memory, and are already implemented within the Essential functions, so there is no need to call them again.
new_transaction
working_transaction* new_transaction()
This function instantiates a new working_transaction structure for use. It allocates memory using dogecoin_calloc(), auto increments the index, instantiates a new dogecoin_tx structure, adds the working_transaction to the hash table and finally returns a pointer to the newly created working_transaction.
C usage:
working_transaction* transaction = new_transaction();
add_transaction
void add_transaction(working_transaction *working_tx)
This function takes a working_transaction generated from new_transaction() and adds it to the hash table.
C usage:
working_transaction* working_tx = new_transaction();
add_transaction(working_tx);
find_transaction
working_transaction* find_transaction(int idx)
This function returns a pointer to the working transaction at the specified index. If no transaction exists at that index, the function will return a NULL pointer.
C usage:
working_transaction* working_tx = find_transaction(1);
remove_transaction
void remove_transaction(working_transaction *working_tx)
This function removes a working_transaction from the hash table and deallocates all memory dedicated to the working_transaction and the objects it contains using dogecoin_free().
C usage:
working_transaction* working_tx = find_transaction(1);
remove_transaction(working_tx);
Essential Transaction API
These functions implement the core functionality of Libdogecoin for building transactions, and are described in depth below. You can access them through a C program, by including the libdogecoin.h header in the source code and including the libdogecoin.a library at compile time.
start_transaction
int start_transaction()
This function instantiates a new working_transaction structure and returns its index for future retrieval as an integer. This new working_transaction will contain an empty hex, which is "01000000000000000000". Note that anytime a new working transaction is created, it must also be removed at the end of the session by calling either clear_transaction(), otherwise a memory leak may occur.
C usage:
#include "libdogecoin.h"

int main() {
    int index = start_transaction();
    // build onto the working transaction here
    clear_transaction(index);
}
add_utxo
int add_utxo(int txindex, char* hex_utxo_txid, int vout)
An unspent transaction output (utxo) is an output of a previous transaction in which funds were sent to the user's address. These can be spent by including them as inputs in a new transaction. This function takes in a working_transaction's index as an integer (txindex), a raw hexadecimal string id of the transaction containing the utxo to spend (hex_utxo_txid), and index of the desired utxo within the previous transaction's list of outputs (vout). The utxo is then added to the working_transaction->transaction->vin field, returning either 1 for success or 0 for failure.
C usage:
#include "libdogecoin.h"

int main() {
    char* prev_output_txid = "b4455e7b7b7acb51fb6feba7a2702c42a5100f61f61abafa31851ed6ae076074"; // worth 2 dogecoin
    int prev_output_n = 1;

    int index = start_transaction();
    if (!add_utxo(index, prev_output_txid, prev_output_n)) {
        // handle failure, return false; or printf("failure\n"); etc...
    }
    clear_transaction(index);
}
add_output
int add_output(int txindex, char* destinationaddress, char* amount)
In order to actually spend utxos, the user must specify the new recipient address and how much of the total input amount will be sent to this address. This function takes in a working_transaction's index as an integer (txindex), the string p2pkh address of the new recipient (destinationaddress), and the amount in Dogecoin (amount) to send. This new output will be added to the working_transaction->transaction->vout field, returning either 1 for success or 0 for failure.
C usage:
#include "libdogecoin.h"

int main() {
    char* prev_output_txid = "42113bdc65fc2943cf0359ea1a24ced0b6b0b5290db4c63a3329c6601c4616e2"; // worth 10 dogecoin
    int prev_output_n = 1;
    char* external_address = "nbGfXLskPh7eM1iG5zz5EfDkkNTo9TRmde";

    int index = start_transaction();
    add_utxo(index, prev_output_txid, prev_output_n);
    if (!add_output(index, external_address, "5.0")) { // 5 dogecoin to be sent
        // error handling here
    }
    clear_transaction(index);
}
finalize_transaction
char* finalize_transaction(int txindex, char* destinationaddress, char* subtractedfee, char* out_dogeamount_for_verification, char* changeaddress)
Because Dogecoin protocol requires that utxos must be spent in full, an additional output is usually included in a transaction to return all the leftover funds to the sender. This function automatically handles both creating this extra output and reserving some funds for the network fee. It takes in a working_transaction's index as an integer (txindex), the external destination address we are sending to (destinationaddress), the desired fee to be subtracted (subtractedfee), the total amount of all inputs included through add_utxo() (out_dogeamount_for_verification), and the public key of the sender (public_key). In addition to making change and deducting the fee, it checks that all of the recipients included in the transaction outputs are valid by converting their script hashes to p2pkh, and returns false if any are not found. Otherwise, the hex of the finalized transaction is returned as a string.
C usage:
#include "libdogecoin.h"
#include <stdio.h>

int main() {
    char* prev_output_txid_2 = "b4455e7b7b7acb51fb6feba7a2702c42a5100f61f61abafa31851ed6ae076074"; // worth 2 dogecoin
    char* prev_output_txid_10 = "42113bdc65fc2943cf0359ea1a24ced0b6b0b5290db4c63a3329c6601c4616e2"; // worth 10 dogecoin
    int prev_output_n_2 = 1;
    int prev_output_n_10 = 1;
    char* external_address = "nbGfXLskPh7eM1iG5zz5EfDkkNTo9TRmde";
    char* my_address = "noxKJyGPugPRN4wqvrwsrtYXuQCk7yQEsy";

    int index = start_transaction();
    add_utxo(index, prev_output_txid_2, prev_output_n_2);
    add_utxo(index, prev_output_txid_10, prev_output_n_10);
    add_output(index, external_address, "5.0");

    // finalize transaction with min fee of 0.00226 doge on the input total of 12 dogecoin
    char* rawhex = finalize_transaction(index, external_address, "0.00226", "12.0", my_address);
    printf("Finalized transaction hex is %s.", rawhex);
    clear_transaction(index);
}
finalize_transaction_ex
int finalize_transaction_ex(int txindex, const char* destinationaddress, const char* subtractedfee, const char* total_in_doge, const char* changeaddress, char* out_hex, size_t out_cap);
finalize_transaction_ex one-shots the “close & return change” step while avoiding a heap allocation: it finalizes the working transaction at txindex, figures out fees / change exactly as finalize_transaction() does, hex-serialises the result straight into the caller-supplied buffer out_hex (whose capacity in bytes is out_cap), then returns the number of characters written (not counting the terminating '\0').
If any argument is invalid or the buffer is too small the function returns 0.
C usage:
// build the TX (add_utxo / add_output)

char txhex[TXHEXMAXLEN + 1];          // +1 for the NUL
int n = finalize_transaction_ex(idx,
                                "nbGfXLskPh7eM1iG5zz5EfDkkNTo9TRmde", // destination
                                "0.00226",                            // fee
                                "12.0",                               // total inputs
                                "noxKJyGPugPRN4wqvrwsrtYXuQCk7yQEsy", // change back here
                                txhex,
                                sizeof(txhex));

if (n == 0) {
    // handle error
} else {
    printf("Finalised TX (%d chars):\n%s\n", n, txhex);
}
get_raw_transaction
char* get_raw_transaction(int txindex)
This function takes in a working_transaction's index as an integer (txindex) and returns the current working_transaction in raw hexadecimal format.
C usage:
#include "libdogecoin.h"
#include <stdio.h>

int main() {
    int index = start_transaction();
    char* rawhex = get_raw_transaction(index);
    printf("The transaction hex at index %d is %s.\n", index, rawhex);
    clear_transaction(index);
}
get_raw_transaction_ex
int get_raw_transaction_ex(int   txindex,
                           char* buf,
                           size_t buf_cap);
The get_raw_transaction_ex function writes the raw hexadecimal representation of the working transaction at index txindex into the caller-supplied buffer buf (of total size buf_cap). On success it returns the number of characters written (not counting the terminating '\0'); if the index is invalid, a pointer is NULL, or the buffer is too small, it returns 0. Unlike get_raw_transaction(), this version avoids allocating a new string on the heap, making it ideal when you already manage your own buffer.
C usage:
char buf[TXHEXMAXLEN + 1];
int len = get_raw_transaction_ex(index, buf, sizeof(buf));
if (len == 0) {
    // handle error
} else {
    printf("Transaction hex: %s\n", buf);
}
clear_transaction
void clear_transaction(int txindex)
This function takes in a working_transaction's index as an integer (txindex), and removes the transaction at that index from the hash table. All memory dedicated to transaction objects, such as dogecoin_tx_in and dogecoin_tx_out, is freed from within this function.
C usage:
#include "libdogecoin.h"
#include <stdio.h>

int main() {
    int index = start_transaction();
    clear_transaction(index);
    printf("The transaction hex at index %d is %s.\n", index, get_raw_transaction(index)); // should return (null)
}
sign_raw_transaction
int sign_raw_transaction(int inputindex, char* incomingrawtx, char* scripthex, int sighashtype, char* privkey)
This function takes in an index denoting which of the current transaction's inputs to sign (inputindex), the raw hexadecimal representation of the transaction to sign (incomingrawtx), the pubkey script in hexadecimal format (scripthex), the signature hash type (sighashtype) and the WIF-encoded private key used to sign the input (privkey). Signature hash type in normal use cases is set to 1 to denote that anyone can pay. In C, the function returns a boolean denoting success, but the actual signed transaction hex is passed back through incomingrawtx. Important: sign_raw_transaction must be run within a secp256k1 context, which can be created by calling dogecoin_ecc_start() and dogecoin_ecc_stop() as shown below.
Note: The incomingrawtx buffer must be the buffer returned by get_raw_transaction(), otherwise the signed hex may overflow.
C usage:
#include "libdogecoin.h"
#include <stdio.h>

int main() {
    char* prev_output_txid_2 = "b4455e7b7b7acb51fb6feba7a2702c42a5100f61f61abafa31851ed6ae076074"; // worth 2 dogecoin
    char* prev_output_txid_10 = "42113bdc65fc2943cf0359ea1a24ced0b6b0b5290db4c63a3329c6601c4616e2"; // worth 10 dogecoin
    int prev_output_n_2 = 1;
    int prev_output_n_10 = 1;
    char* external_address = "nbGfXLskPh7eM1iG5zz5EfDkkNTo9TRmde";
    char* my_address = "noxKJyGPugPRN4wqvrwsrtYXuQCk7yQEsy";
    char* my_script_pubkey = "76a914d8c43e6f68ca4ea1e9b93da2d1e3a95118fa4a7c88ac";
    char* my_privkey = "ci5prbqz7jXyFPVWKkHhPq4a9N8Dag3TpeRfuqqC2Nfr7gSqx1fy";

    int index = start_transaction();
    add_utxo(index, prev_output_txid_2, prev_output_n_2);
    add_utxo(index, prev_output_txid_10, prev_output_n_10);
    add_output(index, external_address, "5.0");
    finalize_transaction(index, external_address, "0.00226", "12.0", my_address);

    //sign both inputs of the current finalized transaction
    dogecoin_ecc_start();
    char* rawhex = get_raw_transaction(index);
    sign_raw_transaction(0, rawhex, my_script_pubkey, 1, my_privkey);
    sign_raw_transaction(1, rawhex, my_script_pubkey, 1, my_privkey);
    dogecoin_ecc_stop();
    printf("The final signed transaction hex is: %s\n", rawhex);
    clear_transaction(index);
}
sign_raw_transaction_ex
int sign_raw_transaction_ex(int           inputindex,
                            const char*   incomingrawtx,
                            char*         signedrawtx,
                            size_t*       signed_size,
                            const char*   scripthex,
                            int           sighashtype,
                            const char*   privkey);
The sign_raw_transaction_ex function offers a two-step interface for signing a single input of a raw transaction. In query mode, you pass signedrawtx == NULL; the function writes the required buffer size (including the null terminator) into *signed_size and returns 1. In write mode, you allocate at least that many bytes, pass the buffer in signedrawtx (with *signed_size set to its capacity), and call it again. On success it writes the signed transaction hex (plus '\0') into your buffer and returns 1; on failure it returns 0. This pattern avoids extra heap allocations when you want to supply your own output buffer.
C usage:
// Stage 1: query required size
size_t need = 0;
if (!sign_raw_transaction_ex(0, rawhex, NULL, &need, scripthex, 1, wif)) {
    // error
}

// Stage 2: allocate and sign
char *out = malloc(need);
if (!out) { /* OOM */ }
if (!sign_raw_transaction_ex(0, rawhex, out, &need, scripthex, 1, wif)) {
    // error
}
printf("Signed transaction: %s\n", out);
free(out);
sign_transaction
int sign_transaction(int txindex, char* script_pubkey, char* privkey)
This function takes in a working transaction structure's index as an integer (txindex), the pubkey in script hex form (script_pubkey) and the WIF-encoded private key (privkey). Each input is then signed using the specified private key, and the final signed transaction is saved to the hash table, which can be retrieved using get_raw_transaction(). The return value of sign_transaction() is a boolean denoting whether the signing was successful, but the output from get_raw_transaction() is a fully signed transaction that--if all information is valid--can be broadcast to miners and incorporated into the blockchain. Important: sign_transaction must also be run within a secp256k1 context, which can be created by calling dogecoin_ecc_start() and dogecoin_ecc_stop() as shown below.
C usage:
#include "libdogecoin.h"
#include <stdio.h>

int main() {
    char* prev_output_txid_2 = "b4455e7b7b7acb51fb6feba7a2702c42a5100f61f61abafa31851ed6ae076074"; // worth 2 dogecoin
    char* prev_output_txid_10 = "42113bdc65fc2943cf0359ea1a24ced0b6b0b5290db4c63a3329c6601c4616e2"; // worth 10 dogecoin
    int prev_output_n_2 = 1;
    int prev_output_n_10 = 1;
    char* external_address = "nbGfXLskPh7eM1iG5zz5EfDkkNTo9TRmde";
    char* my_address = "noxKJyGPugPRN4wqvrwsrtYXuQCk7yQEsy";
    char* my_script_pubkey = "76a914d8c43e6f68ca4ea1e9b93da2d1e3a95118fa4a7c88ac";
    char* my_privkey = "ci5prbqz7jXyFPVWKkHhPq4a9N8Dag3TpeRfuqqC2Nfr7gSqx1fy";

    int index = start_transaction();
    add_utxo(index, prev_output_txid_2, prev_output_n_2);
    add_utxo(index, prev_output_txid_10, prev_output_n_10);
    add_output(index, external_address, "5.0");
    finalize_transaction(index, external_address, "0.00226", "12.0", my_address);

    //sign both inputs of the current finalized transaction
    dogecoin_ecc_start();
    if (!sign_transaction(index, my_script_pubkey, my_privkey)) {
        // error handling here
    }
    dogecoin_ecc_stop();
    printf("The final signed transaction hex is: %s\n", get_raw_transaction(index));
    clear_transaction(index);
}
store_raw_transaction
int store_raw_transaction(char* incomingrawtx)
This function is equivalent to save_raw_transaction but takes the next available index in the hash table to save the provided transaction hex (incomingrawtx), rather than allowing the user to specify which index. It then returns this automatically chosen index as an integer.
C usage:
#include "libdogecoin.h"
#include <stdio.h>

int main() {
    char* hex_to_store = "0100000001746007aed61e8531faba1af6610f10a5422c70a2a7eb6ffb51cb7a7b7b5e45b40100000000ffffffff0000000000";
    int index = store_raw_transaction(hex_to_store);
    printf("The transaction hex at index %d is %s.\n", index, get_raw_transaction(index));
    clear_transaction(index);
}
sign_indexed_raw_transaction_ex
int sign_indexed_raw_transaction_ex(int txindex,
                                    int inputindex,
                                    const char* scripthex,
                                    int sighashtype,
                                    const char* privkey,
                                    char* buf,
                                    size_t buf_cap);
Signs one specific input (inputindex) of the working transaction stored at txindex, writes the fully-updated raw-hex straight into the caller-supplied buffer buf (capacity buf_cap) and returns the number of hex characters written (not counting the terminating '\0').
If the buffer is too small or any argument is invalid the function returns 0.
char signedhex[TXHEXMAXLEN + 1];
int n = sign_indexed_raw_transaction_ex(idx,        /* tx we're editing   */
                                        0,          /* which vin to sign  */
                                        scripthex,  /* utxo's scriptPubKey*/
                                        1,          /* SIGHASH_ALL        */
                                        wif,        /* signing key        */
                                        signedhex,
                                        sizeof signedhex);
if (n == 0) { /* error */ }
sign_transaction_ex
int sign_transaction_ex(int txindex,
                         const char* script_pubkey,
                         const char* privkey,
                         char* buf,
                         size_t buf_cap);
High-level helper that iterates over all inputs of the working transaction at txindex, signing each one with the same script_pubkey / privkey pair, then emits the completely-signed transaction hex into buf.
Return-value semantics are identical to the previous function.
char finalhex[TXHEXMAXLEN + 1];
if (!sign_transaction_ex(idx, scripthex, wif, finalhex, sizeof finalhex)) {
    /* signing failed */
}
printf("fully-signed tx:\n%s\n", finalhex);
sign_transaction_w_privkey_ex
int sign_transaction_w_privkey_ex(int txindex,
                                  const char* privkey,
                                  char* buf,
                                  size_t buf_cap);
Single-key convenience wrapper: derives the P2PKH scriptPubKey from privkey, signs every input of the transaction at txindex, and streams the result into buf.
Ideal for the common all inputs belong to the same wallet scenario.
char txhex[TXHEXMAXLEN + 1];
if (!sign_transaction_w_privkey_ex(idx, wif, txhex, sizeof txhex)) {
    /* error */
}
Dogecoin Transaction Overview
The dogecoin_tx structure describes a dogecoin transaction in reply to getdata. When a bloom filter is applied tx objects are sent automatically for matching transactions following the merkleblock. It is composed of the following fields:
| Field Size | Description | Data type | Comments |
|---|---|---|---|
| 4 | version | uint32_t | Transaction data format version |
| 1+ | tx_in count | var_int | Number of Transaction inputs (never zero) |
| 41+ | tx_in | tx_in[] | A list of 1 or more transaction inputs or sources for coins |
| 1+ | tx_out count | var_int | Number of Transaction outputs |
| 9+ | tx_out | tx_out[] | A list of 1 or more transaction outputs or destinations for coins |
| 4 | lock_time | uint32_t | The block number or timestamp at which this transaction is unlocked: 0 == not locked, < 500000000 == Block number at which this transaction is unlocked, >= 500000000 == UNIX timestamp at which this transaction is unlocked. If all TxIn have final (0xffffffff) sequence numbers then lock_time is irrelevant. Otherwise, the transaction may not be added to a block until after lock_time (see NLockTime). |
include/dogecoin/tx.h:
typedef struct dogecoin_tx_ {
    int32_t version;
    vector_t* vin;
    vector_t* vout;
    uint32_t locktime;
} dogecoin_tx;
Every transaction is composed of inputs and outputs, which specify where the funds came from and where they will go. These are represented by the dogecoin_tx_in and dogecoin_tx_out structs below.
Dogecoin Transaction Input
The dogecoin_tx_in structure consists of the following fields:
| Field Size | Description | Data type | Comments |
|---|---|---|---|
| 36 | previous_output | outpoint | The previous output transaction reference, as an Outpoint structure |
| 1+ | script_length | var_int | The length of the signature script |
| ? | signature_script | uchar[] | Computational Script for confirming transaction authorization |
| 4 | sequence | uint32_t | Transaction version as defined by the sender. Intended for "replacement" of transactions when information is updated before inclusion into a block. |
include/dogecoin/tx.h:
typedef struct dogecoin_tx_in_ {
    dogecoin_tx_outpoint prevout;
    cstring* script_sig;
    uint32_t sequence;
} dogecoin_tx_in;
The dogecoin_tx_outpoint structure represented above as prevout consists of the following fields:
| Field Size | Description | Data type | Comments |
|---|---|---|---|
| 32 | hash | char[32] | The hash of the referenced transaction |
| 4 | index | uint32_t | The index of the specific output in the transaction. The first output is 0, etc. |
include/dogecoin/tx.h:
typedef struct dogecoin_tx_outpoint_ {
    uint256_t hash;
    uint32_t n;
} dogecoin_tx_outpoint;
Dogecoin Transaction Output
The dogecoin_tx_out structure consists of the following fields:
| Field Size | Description | Data type | Comments |
|---|---|---|---|
| 8 | value | int64_t | Transaction value |
| 1+ | pk_script length | var_int | Length of the pk_script |
| ? | pk_script | uchar[] | Usually contains the public key as a dogecoin script setting up conditions to claim this output. |
include/dogecoin/tx.h:
typedef struct dogecoin_tx_out_ {
    int64_t value;
    cstring* script_pubkey;
} dogecoin_tx_out;
Standard Transaction to Dogecoin Address (pay-to-pubkey-hash)
The dogecoin_script structure consists of a series of pieces of information and operations related to the value of the transaction. When notating scripts, data to be pushed to the stack is generally enclosed in angle brackets and data push commands are omitted. Non-bracketed words are opcodes. These examples include the "OP_" prefix, but it is permissible to omit it. Thus "
scriptPubKey: OP_DUP OP_HASH160 <pubKeyHash> OP_EQUALVERIFY OP_CHECKSIG
scriptSig: <sig> <pubKey>
To demonstrate how scripts look on the wire, here is a raw scriptPubKey:
  76       A9             14
OP_DUP OP_HASH160    Bytes to push

89 AB CD EF AB BA AB BA AB BA AB BA AB BA AB BA AB BA AB BA   88         AC
                      Data to push                     OP_EQUALVERIFY OP_CHECKSIG
Note: scriptSig is in the input of the spending transaction and scriptPubKey is in the output of the previously unspent i.e. "available" transaction.
Here is how each word is processed:
| Stack | Script | Description |
|---|---|---|
| Empty | <sig> <pubKey> OP_DUP OP_HASH160 <pubKeyHash> OP_EQUALVERIFY OP_CHECKSIG | scriptSig and scriptPubKey are combined. |
<sig> <pubKey> | OP_DUP OP_HASH160 <pubKeyHash> OP_EQUALVERIFY OP_CHECKSIG | Constants are added to the stack. |
<sig> <pubKey> <pubKey> | OP_HASH160 <pubKeyHash> OP_EQUALVERIFY OP_CHECKSIG | Top stack item is duplicated. |
<sig> <pubKey> <pubHashA> | <pubKeyHash> OP_EQUALVERIFY OP_CHECKSIG | Top stack item is hashed. |
<sig> <pubKey> <pubHashA> <pubKeyHash> | OP_EQUALVERIFY OP_CHECKSIG | Constant added. |
<sig> <pubKey> | OP_CHECKSIG | Equality is checked between the top two stack items. |
| true | Empty | Signature is checked for top two stack items. |
include/dogecoin/tx.h:
typedef struct dogecoin_script_ {
    int* data;
    size_t limit;   // Total size of the vector
    size_t current; //Number of vectors in it at present
} dogecoin_script;
* The examples above were derived from https://en.bitcoin.it
YubiKey Storage of Encrypted Keys
The YubiKey is a hardware security key that provides strong two-factor authentication and secure cryptographic operations. By integrating the YubiKey with libdogecoin, users can enhance the security of their wallets and transactions. While the integration is tested with YubiKey 5 NFC, it also works with other YubiKey models that support PIV (Personal Identity Verification).
YubiKey supports numerous cryptographic operations; for libdogecoin, we are primarily interested in the PIV application. The PIV application provides a secure way to store private keys. The YubiKey acts as secure key storage, protecting the private keys from unauthorized access.
We have integrated the YubiKey with the seal module, specifically for encrypted key storage. The seal module is responsible for encrypting and decrypting the private keys stored in the YubiKey. By using the YubiKey, users can securely store and retrieve their private keys during wallet operations.
The process involves multi-factor authentication (PIN and YubiKey) to unlock the encrypted keys, followed by the decryption of BIP39 mnemonics. The seed, master key, or mnemonic is first encrypted with software and then stored on the YubiKey. During the storage process, the user enters a management password, and to retrieve the key, the user enters the YubiKey PIN.
Its recommeded that the user download the YubiKey Manager to manage the YubiKey. The YubiKey Manager is a graphical user interface that allows users to change the PIN, management key, and other settings. The YubiKey Manager is available for Windows, macOS, and Linux from the Yubico website.
Dependencies
libykpiv- The YubiKey C library for interacting with the YubiKey.libykpiv-dev- The development headers for the YubiKey C library.pcscd- The PC/SC smart card daemon for managing smart card readers.libpcsclite-dev- The development headers for the PC/SC smart card library.
Installation
Linux
sudo apt-get update
sudo apt-get install libykpiv libykpiv-dev pcscd libpcsclite-dev
Example C Code
// Encrypt a BIP32 seed with software and store it on YubiKey
u_assert_true(dogecoin_encrypt_seed_with_sw_to_yubikey(seed, sizeof(SEED), TEST_FILE, true, test_password));
debug_print("Seed to YubiKey: %s\n", utils_uint8_to_hex(seed, sizeof(SEED)));
debug_print("Encrypted seed: %s\n", utils_uint8_to_hex(file, filesize));

// Decrypt a BIP32 seed with software after retrieving it from YubiKey
uint8_t decrypted_seed[4096] = {0};
u_assert_true(dogecoin_decrypt_seed_with_sw_from_yubikey(decrypted_seed, TEST_FILE, test_password));
debug_print("Decrypted seed: %s\n", utils_uint8_to_hex(decrypted_seed, decrypted_size));
u_assert_true(memcmp(seed, decrypted_seed, sizeof(SEED)) == 0);
Community Projects
- dogecoin-js
- dart-libdogecoin
- Lib.Dogecoin
- RadioDoge-FirmwareInstaller
- Alien-Libdogecoin
- Finance-libdogecoin
Foundation Projects
Project stages
We understand that there's a steep lerning curve for most of the folk working on this project, and that's OK. This is an inflection point for the Dogecoin community: moving from a tiny dev team to a wider #dogeDevArmy is great for derisking the bus-factor aspect of Dogecoin. The process of creating libdogecoin is an important step toward a broader and more sustainable community of devs.
With that in mind we're suggesting a staged approach to this project. Starting with the basics and delivering working vertical slices of functionality as a useful C library with a handful of higher level language wrappers early, should force us to solve fundamental concerns such as language wrappers, testing and other issues before getting too far down a rabbit hole.
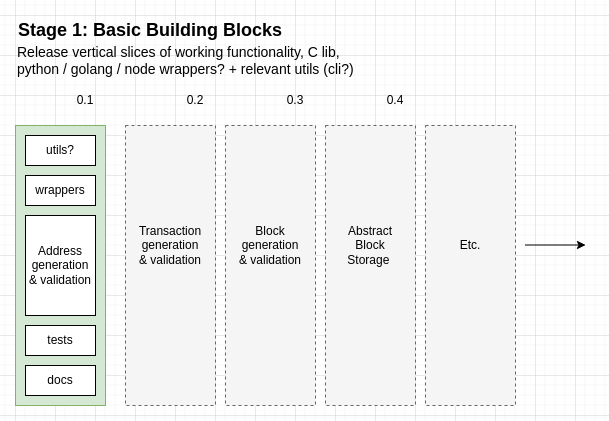
Stage one lets us learn and understand the lowest level building blocks of Dogecoin as we build each slice of functionality and deliver incremental releases with full tests, doc and perhaps even commandline utilities that exercise them. We expect that this approach will gain momentum after the first and second 'slice' as we face and solve the problems of library design, building effective language wrappers etc.
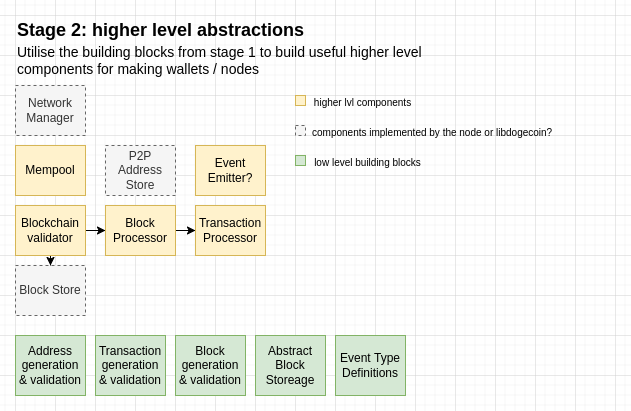
Stage two makes use of the low level building blocks we've delivered by combining them into higher level components that are needed to build wallets and nodes. This is where we deliver the parts needed for other members of the community to cobble together operational doge projects.
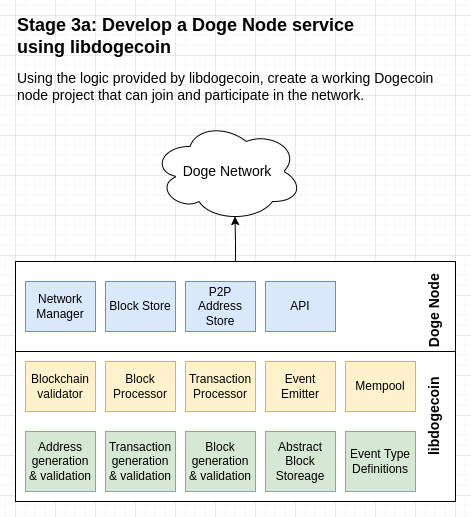
Stage three A takes what we've built and uses it to create a new Dogecoin Node service (in C) capable of joining the network and participating in the blockchain. The plan is to make this new DogeNode available for Windows, Linux, MacOS etc. in a simple-to-setup manner that will encourage new users to support the network.
This DogeNode should be far simpler to maintain, being abstracted from the many 'and the kitchen sink' additions that encumber the Dogecoin Core daemon.
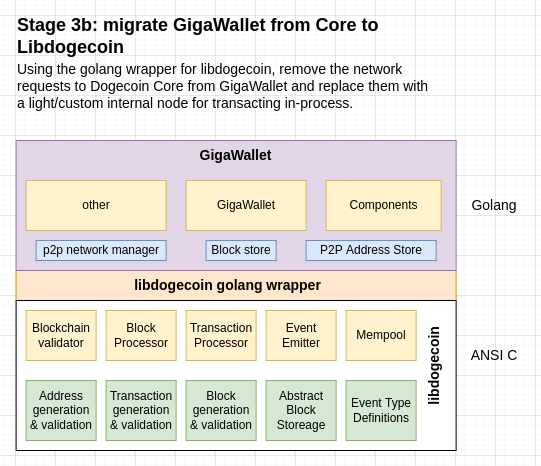
At the same time, GigaWallet which is being built around the Dogecoin Core APIs can be easily ported to libdogecoin so it can operate directly on L1 to transact dogecoin. This will be the first major project using libdogecoin via a language binding, and prove the ability for libdogecoin to enable greater flexibility in how the community can get involved in development.
Release Process
- Open PR to main that
- adds release notes to
doc/changelog.md(see below) and - if this is not a patch release, updates
_PKG_VERSION_{MAJOR,MINOR}and_LIB_VERSIONS_*inconfigure.ac
- adds release notes to
- After the PR is merged,
- if this is not a patch release, create a release branch with name
MAJOR.MINOR. Make sure that the branch contains the right commits. Create commit on the release branch that sets_PKG_VERSION_IS_RELEASEinconfigure.actotrue. - if this is a patch release, open a pull request with the bugfixes to the
MAJOR.MINORbranch. Also include the release note commit bump_PKG_VERSION_PATCHand_LIB_VERSIONS_*inconfigure.ac.
- if this is not a patch release, create a release branch with name
- Tag the commit with
git tag -s vMAJOR.MINOR.PATCH. - Push branch and tag with
git push origin --tags. - Create a new GitHub release with a link to the corresponding entry in
doc/changelog.md.
Changelog
[Released]
[0.1.4] - 2025-04-10
What's Changed
- merge v0.1.3 into main by @xanimo in https://github.com/dogecoinfoundation/libdogecoin/pull/204
- added 'tbs' library link by @UsaRandom in https://github.com/dogecoinfoundation/libdogecoin/pull/205
- net: added disconnected state for shutdown by @edtubbs in https://github.com/dogecoinfoundation/libdogecoin/pull/207
- src: added intel assembly for sha algs by @edtubbs in https://github.com/dogecoinfoundation/libdogecoin/pull/208
- ci: comment out arm64-macos due to gh billing by @xanimo in https://github.com/dogecoinfoundation/libdogecoin/pull/209
- build: require secp256k1 build first in Makefile by @xanimo in https://github.com/dogecoinfoundation/libdogecoin/pull/211
- ci: pin macos version to 12 instead of latest by @xanimo in https://github.com/dogecoinfoundation/libdogecoin/pull/214
- net: added http server by @edtubbs in https://github.com/dogecoinfoundation/libdogecoin/pull/212
- blockchain: moved chainwork to blockindex by @edtubbs in https://github.com/dogecoinfoundation/libdogecoin/pull/213
- crypto: adds chacha20 and fast_random_context by @xanimo in https://github.com/dogecoinfoundation/libdogecoin/pull/210
- fix DragonFlyBSD 6.4-RELEASE support by @movepointsolutions in https://github.com/dogecoinfoundation/libdogecoin/pull/182
- Make getDerivedHDAddress return address, not key by @chromatic in https://github.com/dogecoinfoundation/libdogecoin/pull/218
- spvnode: move http callback function to it's own respective file by @xanimo in https://github.com/dogecoinfoundation/libdogecoin/pull/220
- fixate 0.1.4-dogebox-pre by @xanimo in https://github.com/dogecoinfoundation/libdogecoin/pull/221
- [feat] Add Key Management Enclaves with YubiKey and NanoPC-T6 Support by @edtubbs in https://github.com/dogecoinfoundation/libdogecoin/pull/223
- config: add -levent_core to AC_CHECK_LIB for event_extra by @edtubbs in https://github.com/dogecoinfoundation/libdogecoin/pull/225
- ci: added 'tags' to 'on:' for sign actions by @edtubbs in https://github.com/dogecoinfoundation/libdogecoin/pull/227
- ci: updated runner to macos-13 by @edtubbs in https://github.com/dogecoinfoundation/libdogecoin/pull/229
- optee, openenclave: added custom key path parameter by @edtubbs in https://github.com/dogecoinfoundation/libdogecoin/pull/238
- depends: disable libunistring for mingw32 by @edtubbs in https://github.com/dogecoinfoundation/libdogecoin/pull/228
- src: updated reference and error handling in rest by @edtubbs in https://github.com/dogecoinfoundation/libdogecoin/pull/226
- such: updated usage for public child keys by @edtubbs in https://github.com/dogecoinfoundation/libdogecoin/pull/230
- chainparams: added backup dns seed by @edtubbs in https://github.com/dogecoinfoundation/libdogecoin/pull/239
- add _t suffix to uint256, uint160 and vector types by @edtubbs in https://github.com/dogecoinfoundation/libdogecoin/pull/240
- sha2: added armv8 and armv8.2 crypto by @edtubbs in https://github.com/dogecoinfoundation/libdogecoin/pull/231
- rest: added getTimestamp endpoint by @edtubbs in https://github.com/dogecoinfoundation/libdogecoin/pull/234
- rest: added getLastBlockInfo endpoint by @edtubbs in https://github.com/dogecoinfoundation/libdogecoin/pull/235
- rest: added utxo confirmations by @edtubbs in https://github.com/dogecoinfoundation/libdogecoin/pull/236
- validation: check auxpow PoW before other checks by @edtubbs in https://github.com/dogecoinfoundation/libdogecoin/pull/237
- ci: updated Windows signing certs and root by @edtubbs in https://github.com/dogecoinfoundation/libdogecoin/pull/241
- optee: enable TRNG, add LIBDIR overrides, and switch fortify flag by @edtubbs in https://github.com/dogecoinfoundation/libdogecoin/pull/242
- sha2: moved armv8 and armv82 guards by @edtubbs in https://github.com/dogecoinfoundation/libdogecoin/pull/243
- ci: added windows native release and no tpm builds by @edtubbs in https://github.com/dogecoinfoundation/libdogecoin/pull/244
- wallet: restore logic check by @edtubbs in https://github.com/dogecoinfoundation/libdogecoin/pull/245
- cmake: restore flag settings by @edtubbs in https://github.com/dogecoinfoundation/libdogecoin/pull/246
- docs: update changelog.md by @edtubbs in https://github.com/dogecoinfoundation/libdogecoin/pull/247
- fixate 0.1.4 by @edtubbs in https://github.com/dogecoinfoundation/libdogecoin/pull/248
- fixate gitian descriptors by @xanimo in https://github.com/dogecoinfoundation/libdogecoin/pull/249
- docs: re-update changelog.md by @edtubbs in https://github.com/dogecoinfoundation/libdogecoin/pull/250
- depends: make yubikey depends selectable by @edtubbs in https://github.com/dogecoinfoundation/libdogecoin/pull/251
- docs: finalize changelog.md by @edtubbs in https://github.com/dogecoinfoundation/libdogecoin/pull/252
New Contributors
- @UsaRandom made their first contribution in https://github.com/dogecoinfoundation/libdogecoin/pull/205
- @movepointsolutions made their first contribution in https://github.com/dogecoinfoundation/libdogecoin/pull/182
Full Changelog: https://github.com/dogecoinfoundation/libdogecoin/compare/v0.1.3...v0.1.4
[0.1.3] - 2024-02-07
- logdb: adds files and tests for spv node wallet database by @xanimo in https://github.com/dogecoinfoundation/libdogecoin/pull/110.
- depends: add build support for arm64-apple-darwin by @xanimo in https://github.com/dogecoinfoundation/libdogecoin/pull/111.
- added libdogecoin-config.h to install by @edtubbs in https://github.com/dogecoinfoundation/libdogecoin/pull/112.
- ci/codeql: bump node.js actions from 12 to 16 by @xanimo in https://github.com/dogecoinfoundation/libdogecoin/pull/113.
- config: added config flag for unistring by @edtubbs in https://github.com/dogecoinfoundation/libdogecoin/pull/115.
- spv/wallet: add files and tests by @xanimo in https://github.com/dogecoinfoundation/libdogecoin/pull/117.
- cmake: added use_unistring symbol by @edtubbs in https://github.com/dogecoinfoundation/libdogecoin/pull/118.
- additional secp256k1 source exclusions by @Eshnek in https://github.com/dogecoinfoundation/libdogecoin/pull/119.
- spvnode/wallet: support multiple watch addresses per init by @xanimo in https://github.com/dogecoinfoundation/libdogecoin/pull/120.
- qa: omit p2wpkh section from test_wallet by @xanimo in https://github.com/dogecoinfoundation/libdogecoin/pull/121.
- build: enable building shared lib via cmake by @xanimo in https://github.com/dogecoinfoundation/libdogecoin/pull/122.
- fix minor typo in readme by @themagic314 in https://github.com/dogecoinfoundation/libdogecoin/pull/123.
- ci: update mac osx sdk checksum by @xanimo in https://github.com/dogecoinfoundation/libdogecoin/pull/124.
- scrypt: add files and test by @xanimo in https://github.com/dogecoinfoundation/libdogecoin/pull/125.
- bug-fix: python wrapper missing unistring by @joijuke in https://github.com/dogecoinfoundation/libdogecoin/pull/126.
- python wrapper better setup practice by @joijuke in https://github.com/dogecoinfoundation/libdogecoin/pull/127.
- wallet: add get vout and amount functions and expose koinu str funcs by @xanimo in https://github.com/dogecoinfoundation/libdogecoin/pull/128.
- restruct python wrapper by @joijuke in https://github.com/dogecoinfoundation/libdogecoin/pull/129.
- map: add files and use in deserialize_dogecoin_auxpow_block by @xanimo in https://github.com/dogecoinfoundation/libdogecoin/pull/130.
- wallet: fix rehydration of waddr_rbtree and route wtx to proper vector by @xanimo in https://github.com/dogecoinfoundation/libdogecoin/pull/131.
- spvnode: added wallet files by @edtubbs in https://github.com/dogecoinfoundation/libdogecoin/pull/132.
- wallet: make dogecoin_wallet_scrape_utxos account for edge case by @xanimo in https://github.com/dogecoinfoundation/libdogecoin/pull/133.
- map: remove extraneous swap_bytes function from map.c by @xanimo in https://github.com/dogecoinfoundation/libdogecoin/pull/134.
- qa/spv: shorten block duration on ibd and switch to testnet for spv_test by @xanimo in https://github.com/dogecoinfoundation/libdogecoin/pull/135.
- wrappers: remove wrappers dir, decouple from ci/codeql by @xanimo in https://github.com/dogecoinfoundation/libdogecoin/pull/136.
- spvnode: added headers files by @edtubbs in https://github.com/dogecoinfoundation/libdogecoin/pull/137.
- wallet: prevent duplicate utxos from being added to unspent vector by @xanimo in https://github.com/dogecoinfoundation/libdogecoin/pull/138.
- depends: add support for android by @alamshafil in https://github.com/dogecoinfoundation/libdogecoin/pull/140.
- wallet: fix dogecoin_wallet_unregister_watch_address_with_node by @xanimo in https://github.com/dogecoinfoundation/libdogecoin/pull/142.
- 0.1.3 dev expose tools by @edtubbs in https://github.com/dogecoinfoundation/libdogecoin/pull/143.
- validation: adds block and header checks by @xanimo in https://github.com/dogecoinfoundation/libdogecoin/pull/144.
- lib: expose p2pkh utility functions by @edtubbs in https://github.com/dogecoinfoundation/libdogecoin/pull/145.
- dogecoin_tx_out function in header by @edtubbs in https://github.com/dogecoinfoundation/libdogecoin/pull/147.
- Added bip and private key utilities by @edtubbs in https://github.com/dogecoinfoundation/libdogecoin/pull/148.
- address: adds getHDNodeAndExtKeyByPath, getHDNodePrivateKeyWIFByPath by @xanimo in https://github.com/dogecoinfoundation/libdogecoin/pull/151.
- TPM2 crypto for mnemonics, seeds and keys on windows by @edtubbs in https://github.com/dogecoinfoundation/libdogecoin/pull/153.
- Improve HD address derivation by @chromatic in https://github.com/dogecoinfoundation/libdogecoin/pull/154.
- lib: added key string constants, chainparams and bip32/44 wrappers by @edtubbs in https://github.com/dogecoinfoundation/libdogecoin/pull/158.
- 0.1.3 dev openenclave by @edtubbs in https://github.com/dogecoinfoundation/libdogecoin/pull/159.
- cli: addressed compiler warnings in such and spvnode by @edtubbs in https://github.com/dogecoinfoundation/libdogecoin/pull/160.
- global updates to constants by @edtubbs in https://github.com/dogecoinfoundation/libdogecoin/pull/162.
- software encrypt/decrypt with cli tools by @edtubbs in https://github.com/dogecoinfoundation/libdogecoin/pull/163.
- validation: updated scrypt and pow by @edtubbs in https://github.com/dogecoinfoundation/libdogecoin/pull/164.
- seal: added test_passwd to tpm functions by @edtubbs in https://github.com/dogecoinfoundation/libdogecoin/pull/165.
- seal: added dogecoin_free and dogecoin_mem_zero of passwords by @edtubbs in https://github.com/dogecoinfoundation/libdogecoin/pull/166.
- spvnode: updated usage by @edtubbs in https://github.com/dogecoinfoundation/libdogecoin/pull/167.
- docs: updated tools.md for spvnode by @edtubbs in https://github.com/dogecoinfoundation/libdogecoin/pull/168.
- utils: added getpass by @edtubbs in https://github.com/dogecoinfoundation/libdogecoin/pull/169.
- seal: added encrypted store directory by @edtubbs in https://github.com/dogecoinfoundation/libdogecoin/pull/170.
- vector: updated memory allocation in deserialize by @edtubbs in https://github.com/dogecoinfoundation/libdogecoin/pull/171.
- validation: added scrypt-sse2 by @edtubbs in https://github.com/dogecoinfoundation/libdogecoin/pull/172.
- block: added parent merkle check for auxpow by @edtubbs in https://github.com/dogecoinfoundation/libdogecoin/pull/173.
- hash: added dogecoin_hashwriter_free by @edtubbs in https://github.com/dogecoinfoundation/libdogecoin/pull/174.
- such: fix mantissa during tx edit by @xanimo in https://github.com/dogecoinfoundation/libdogecoin/pull/175.
- ci/ql: added enable-test-passwd option by @edtubbs in https://github.com/dogecoinfoundation/libdogecoin/pull/176.
- tx: emulate tx_in witness_stack vector in tx deser by @xanimo in https://github.com/dogecoinfoundation/libdogecoin/pull/177.
- wallet: free waddrs in dogecoin_wallet_init by @xanimo in https://github.com/dogecoinfoundation/libdogecoin/pull/178.
- headersdb_file: updated dogecoin_headers_db_connect_hdr to reorg by @edtubbs in https://github.com/dogecoinfoundation/libdogecoin/pull/179.
- wallet: redesign utxo and radio doge functions by @xanimo in https://github.com/dogecoinfoundation/libdogecoin/pull/180.
- net: updated check to connect nodes by @edtubbs in https://github.com/dogecoinfoundation/libdogecoin/pull/183.
- ci: added sign jobs for windows and macos by @edtubbs in https://github.com/dogecoinfoundation/libdogecoin/pull/184.
- wallet: added prompt to dogecoin_wallet_load by @edtubbs in https://github.com/dogecoinfoundation/libdogecoin/pull/185.
- chainparams: update chain_from_b58_prefix to detect testnet and regtest by @xanimo in https://github.com/dogecoinfoundation/libdogecoin/pull/187.
- wallet: clear memory leaks from radio doge functions by @xanimo in https://github.com/dogecoinfoundation/libdogecoin/pull/188.
- spv: removed reject on invalid block by @edtubbs in https://github.com/dogecoinfoundation/libdogecoin/pull/189.
- headersdb_file: updated reorg to find common ancestor with memcmp by @edtubbs in https://github.com/dogecoinfoundation/libdogecoin/pull/190.
- ci: added tag check to sign actions by @edtubbs in https://github.com/dogecoinfoundation/libdogecoin/pull/191.
- ci: added test for aarch64-android by @edtubbs in https://github.com/dogecoinfoundation/libdogecoin/pull/192.
- bip39: added fclose to error conditions by @edtubbs in https://github.com/dogecoinfoundation/libdogecoin/pull/193.
- spv: optimize initial block download by @xanimo in https://github.com/dogecoinfoundation/libdogecoin/pull/194.
- ci: reduced uploads for signed builds by @edtubbs in https://github.com/dogecoinfoundation/libdogecoin/pull/195.
- tool: updated pubkey_from_privatekey param by @edtubbs in https://github.com/dogecoinfoundation/libdogecoin/pull/196.
- gitian: bump build system to focal from bionic by @xanimo in https://github.com/dogecoinfoundation/libdogecoin/pull/197.
- cmake: added build type for msvc by @edtubbs in https://github.com/dogecoinfoundation/libdogecoin/pull/198.
- trivial: add copyright script and update copyrights by @xanimo in https://github.com/dogecoinfoundation/libdogecoin/pull/199.
- doc: update changelog.md authored by @edtubbs and committed by @xanimo in https://github.com/dogecoinfoundation/libdogecoin/pull/201.
- ci: bump to actions/cache@v4 for android by @xanimo in https://github.com/dogecoinfoundation/libdogecoin/pull/202.
- ci: config arm64-apple-darwin runner by @xanimo in https://github.com/dogecoinfoundation/libdogecoin/pull/203.
- fixate v0.1.3 by @xanimo in https://github.com/dogecoinfoundation/libdogecoin/pull/200.
New Contributors
- @alamshafil made their first contribution in https://github.com/dogecoinfoundation/libdogecoin/pull/140
- @Eshnek made their first contribution in https://github.com/dogecoinfoundation/libdogecoin/pull/119
- @joijuke made their first contribution in https://github.com/dogecoinfoundation/libdogecoin/pull/126
- @chromatic made their first contribution in https://github.com/dogecoinfoundation/libdogecoin/pull/154
Full Changelog: https://github.com/dogecoinfoundation/libdogecoin/compare/v0.1.2...v0.1.3
[0.1.2] - 2023-03-22
What's Changed
- doc: update transaction signing definitions by @xanimo in https://github.com/dogecoinfoundation/libdogecoin/pull/82
- build: fix up cmake on linux by @xanimo in https://github.com/dogecoinfoundation/libdogecoin/pull/90
- libdogecoin: added wrapper for bip39 by @edtubbs in https://github.com/dogecoinfoundation/libdogecoin/pull/91
- ci: bump i686-pc-linux-gnu from bionic to focal by @xanimo in https://github.com/dogecoinfoundation/libdogecoin/pull/95
- build: add msvs support with cmake by @xanimo in https://github.com/dogecoinfoundation/libdogecoin/pull/93
- docs: added bip39 seedphrases and libunistring by @edtubbs in https://github.com/dogecoinfoundation/libdogecoin/pull/96
- 0.1.2 dev QR support by @michilumin in https://github.com/dogecoinfoundation/libdogecoin/pull/94
- utils: add dogecoin_network_enabled function by @xanimo in https://github.com/dogecoinfoundation/libdogecoin/pull/87
- utils: fix missing libdogecoin-config header by @xanimo in https://github.com/dogecoinfoundation/libdogecoin/pull/97
- added jpeg qr functionality using a modified version of jpec by @michilumin in https://github.com/dogecoinfoundation/libdogecoin/pull/100
- docs: finalize derived hd address functions by @xanimo in https://github.com/dogecoinfoundation/libdogecoin/pull/99
- constants: add header with address definitions by @xanimo in https://github.com/dogecoinfoundation/libdogecoin/pull/101
- doc: updated guidance on bip39 by @edtubbs in https://github.com/dogecoinfoundation/libdogecoin/pull/102
- build: add extra line to eof's by @xanimo in https://github.com/dogecoinfoundation/libdogecoin/pull/103
- Add Moon Files by @qlpqlp in https://github.com/dogecoinfoundation/libdogecoin/pull/98
- sign: add message signing and verification by @xanimo in https://github.com/dogecoinfoundation/libdogecoin/pull/104
- Add key to signing-keys by @edtubbs in https://github.com/dogecoinfoundation/libdogecoin/pull/106
- build: combine libunistring.a in gitian descriptors by @xanimo in https://github.com/dogecoinfoundation/libdogecoin/pull/107
- docs: update changelog.md by @xanimo in https://github.com/dogecoinfoundation/libdogecoin/pull/108
- fixate 0.1.2 as release by @xanimo in https://github.com/dogecoinfoundation/libdogecoin/pull/109
New Contributors
- @edtubbs made their first contribution in https://github.com/dogecoinfoundation/libdogecoin/pull/91
- @qlpqlp made their first contribution in https://github.com/dogecoinfoundation/libdogecoin/pull/98
Full Changelog: https://github.com/dogecoinfoundation/libdogecoin/compare/v0.1.1...v0.1.2
[Released]
[0.1.1] - 2022-10-03
What's Changed
- fixate 0.1.0 by @xanimo in https://github.com/dogecoinfoundation/libdogecoin/pull/59
- open 0.1.1-dev for development by @xanimo in https://github.com/dogecoinfoundation/libdogecoin/pull/60
- Fix all go get errors caused by rename by @quackduck in https://github.com/dogecoinfoundation/libdogecoin/pull/64
- fix bad path for python wrapper in docs by @just-an-dev in https://github.com/dogecoinfoundation/libdogecoin/pull/68
- Fix for dogecoin_script_copy_without_op_codeseperator todo by @nooperation in https://github.com/dogecoinfoundation/libdogecoin/pull/72
- Remove VLAs (variable-length-arrays) from the code. Fix some allocations. by @michilumin in https://github.com/dogecoinfoundation/libdogecoin/pull/75
- Fixed memory cleanup issue in dogecoin_base58_encode_check and updated its declaration by @nooperation in https://github.com/dogecoinfoundation/libdogecoin/pull/76
- address: fix memleaks caused from excessive key lengths by @xanimo in https://github.com/dogecoinfoundation/libdogecoin/pull/77
- address: adds getDerivedHDAddress functions by @xanimo in https://github.com/dogecoinfoundation/libdogecoin/pull/78
- Fixed command and ouputs for HD by @nformant1 in https://github.com/dogecoinfoundation/libdogecoin/pull/79
- (API Change) Fixed the truncation of size_t's to int's in some places by @nooperation in https://github.com/dogecoinfoundation/libdogecoin/pull/80
New Contributors
- @quackduck made their first contribution in https://github.com/dogecoinfoundation/libdogecoin/pull/64
- @just-an-dev made their first contribution in https://github.com/dogecoinfoundation/libdogecoin/pull/68
- @nooperation made their first contribution in https://github.com/dogecoinfoundation/libdogecoin/pull/72
- @nformant1 made their first contribution in https://github.com/dogecoinfoundation/libdogecoin/pull/79
Full Changelog: https://github.com/dogecoinfoundation/libdogecoin/compare/v0.1.0...v0.1.1
[Released]
[0.1.0] - 2022-08-05
What's Changed
- docs: mv diagrams/ to doc/ and amend README.md by @xanimo in https://github.com/dogecoinfoundation/libdogecoin/pull/6
- 0.1-dev-autoreconf by @xanimo in https://github.com/dogecoinfoundation/libdogecoin/pull/8
- qa: omit python from codeql by @xanimo in https://github.com/dogecoinfoundation/libdogecoin/pull/9
- crypto: sha2, rmd160 by @xanimo in https://github.com/dogecoinfoundation/libdogecoin/pull/11
- deps: bitcoin-core/secp256k1 subtree by @xanimo in https://github.com/dogecoinfoundation/libdogecoin/pull/12
- feature: address by @xanimo in https://github.com/dogecoinfoundation/libdogecoin/pull/13
- Example doc format by @tjstebbing in https://github.com/dogecoinfoundation/libdogecoin/pull/15
- Creating first Python wrapper PR by @jaxlotl in https://github.com/dogecoinfoundation/libdogecoin/pull/14
- qa: address_test by @xanimo in https://github.com/dogecoinfoundation/libdogecoin/pull/18
- contrib: formatting by @xanimo in https://github.com/dogecoinfoundation/libdogecoin/pull/21
- Verify address by @jaxlotl in https://github.com/dogecoinfoundation/libdogecoin/pull/22
- mem: fix memleaks by @xanimo in https://github.com/dogecoinfoundation/libdogecoin/pull/24
- Python module refactoring by @jaxlotl in https://github.com/dogecoinfoundation/libdogecoin/pull/25
- Fixing compiler warnings - new_line by @DrinoSan in https://github.com/dogecoinfoundation/libdogecoin/pull/29
- Documentation by @jaxlotl in https://github.com/dogecoinfoundation/libdogecoin/pull/27
- Fixing unit_tests - Increase size of char array by @DrinoSan in https://github.com/dogecoinfoundation/libdogecoin/pull/32
- C improved tests by @jaxlotl in https://github.com/dogecoinfoundation/libdogecoin/pull/31
- Setting fixed size for priv and pubkeys in generatePrivPubKeypair and… by @DrinoSan in https://github.com/dogecoinfoundation/libdogecoin/pull/34
- such: transaction by @xanimo in https://github.com/dogecoinfoundation/libdogecoin/pull/33
- security: refactor koinu conversion functions by @xanimo in https://github.com/dogecoinfoundation/libdogecoin/pull/42
- ci: fix apt-get update step for i686-w64-mingw32 by @xanimo in https://github.com/dogecoinfoundation/libdogecoin/pull/45
- issue template updated to prevent spam in repository by @xanimo in https://github.com/dogecoinfoundation/libdogecoin/pull/44
- transaction: remove all refs to segwit and bech32 by @xanimo in https://github.com/dogecoinfoundation/libdogecoin/pull/46
- security: implement refactored conversion functions by @xanimo in https://github.com/dogecoinfoundation/libdogecoin/pull/43
- trivial: fix up headers by @xanimo in https://github.com/dogecoinfoundation/libdogecoin/pull/47
- include: delete valgrind/valgrind.h by @xanimo in https://github.com/dogecoinfoundation/libdogecoin/pull/48
- cmake: add koinu to CMakeLists.txt by @xanimo in https://github.com/dogecoinfoundation/libdogecoin/pull/49
- crypto: fix mismatched bound on sha256/512_finalize by @xanimo in https://github.com/dogecoinfoundation/libdogecoin/pull/51
- tx: remove bloat from dogecoin_tx_sign_input by @xanimo in https://github.com/dogecoinfoundation/libdogecoin/pull/52
- net: move broadcast_tx from tx to net by @xanimo in https://github.com/dogecoinfoundation/libdogecoin/pull/50
- trivial: fix remaining GCC warnings/errors by @xanimo in https://github.com/dogecoinfoundation/libdogecoin/pull/53
- contrib: update expired signing key for xanimo by @xanimo in https://github.com/dogecoinfoundation/libdogecoin/pull/55
- build: backport autotools/gitian build system by @xanimo in https://github.com/dogecoinfoundation/libdogecoin/pull/54
- doc: update changelog by @xanimo in https://github.com/dogecoinfoundation/libdogecoin/pull/58
Contributors
- @DrinoSan
- @jaxlotl
- @michilumin
- @tjstebbing
- @xanimo
Full Changelog: https://github.com/dogecoinfoundation/libdogecoin/commits/main